


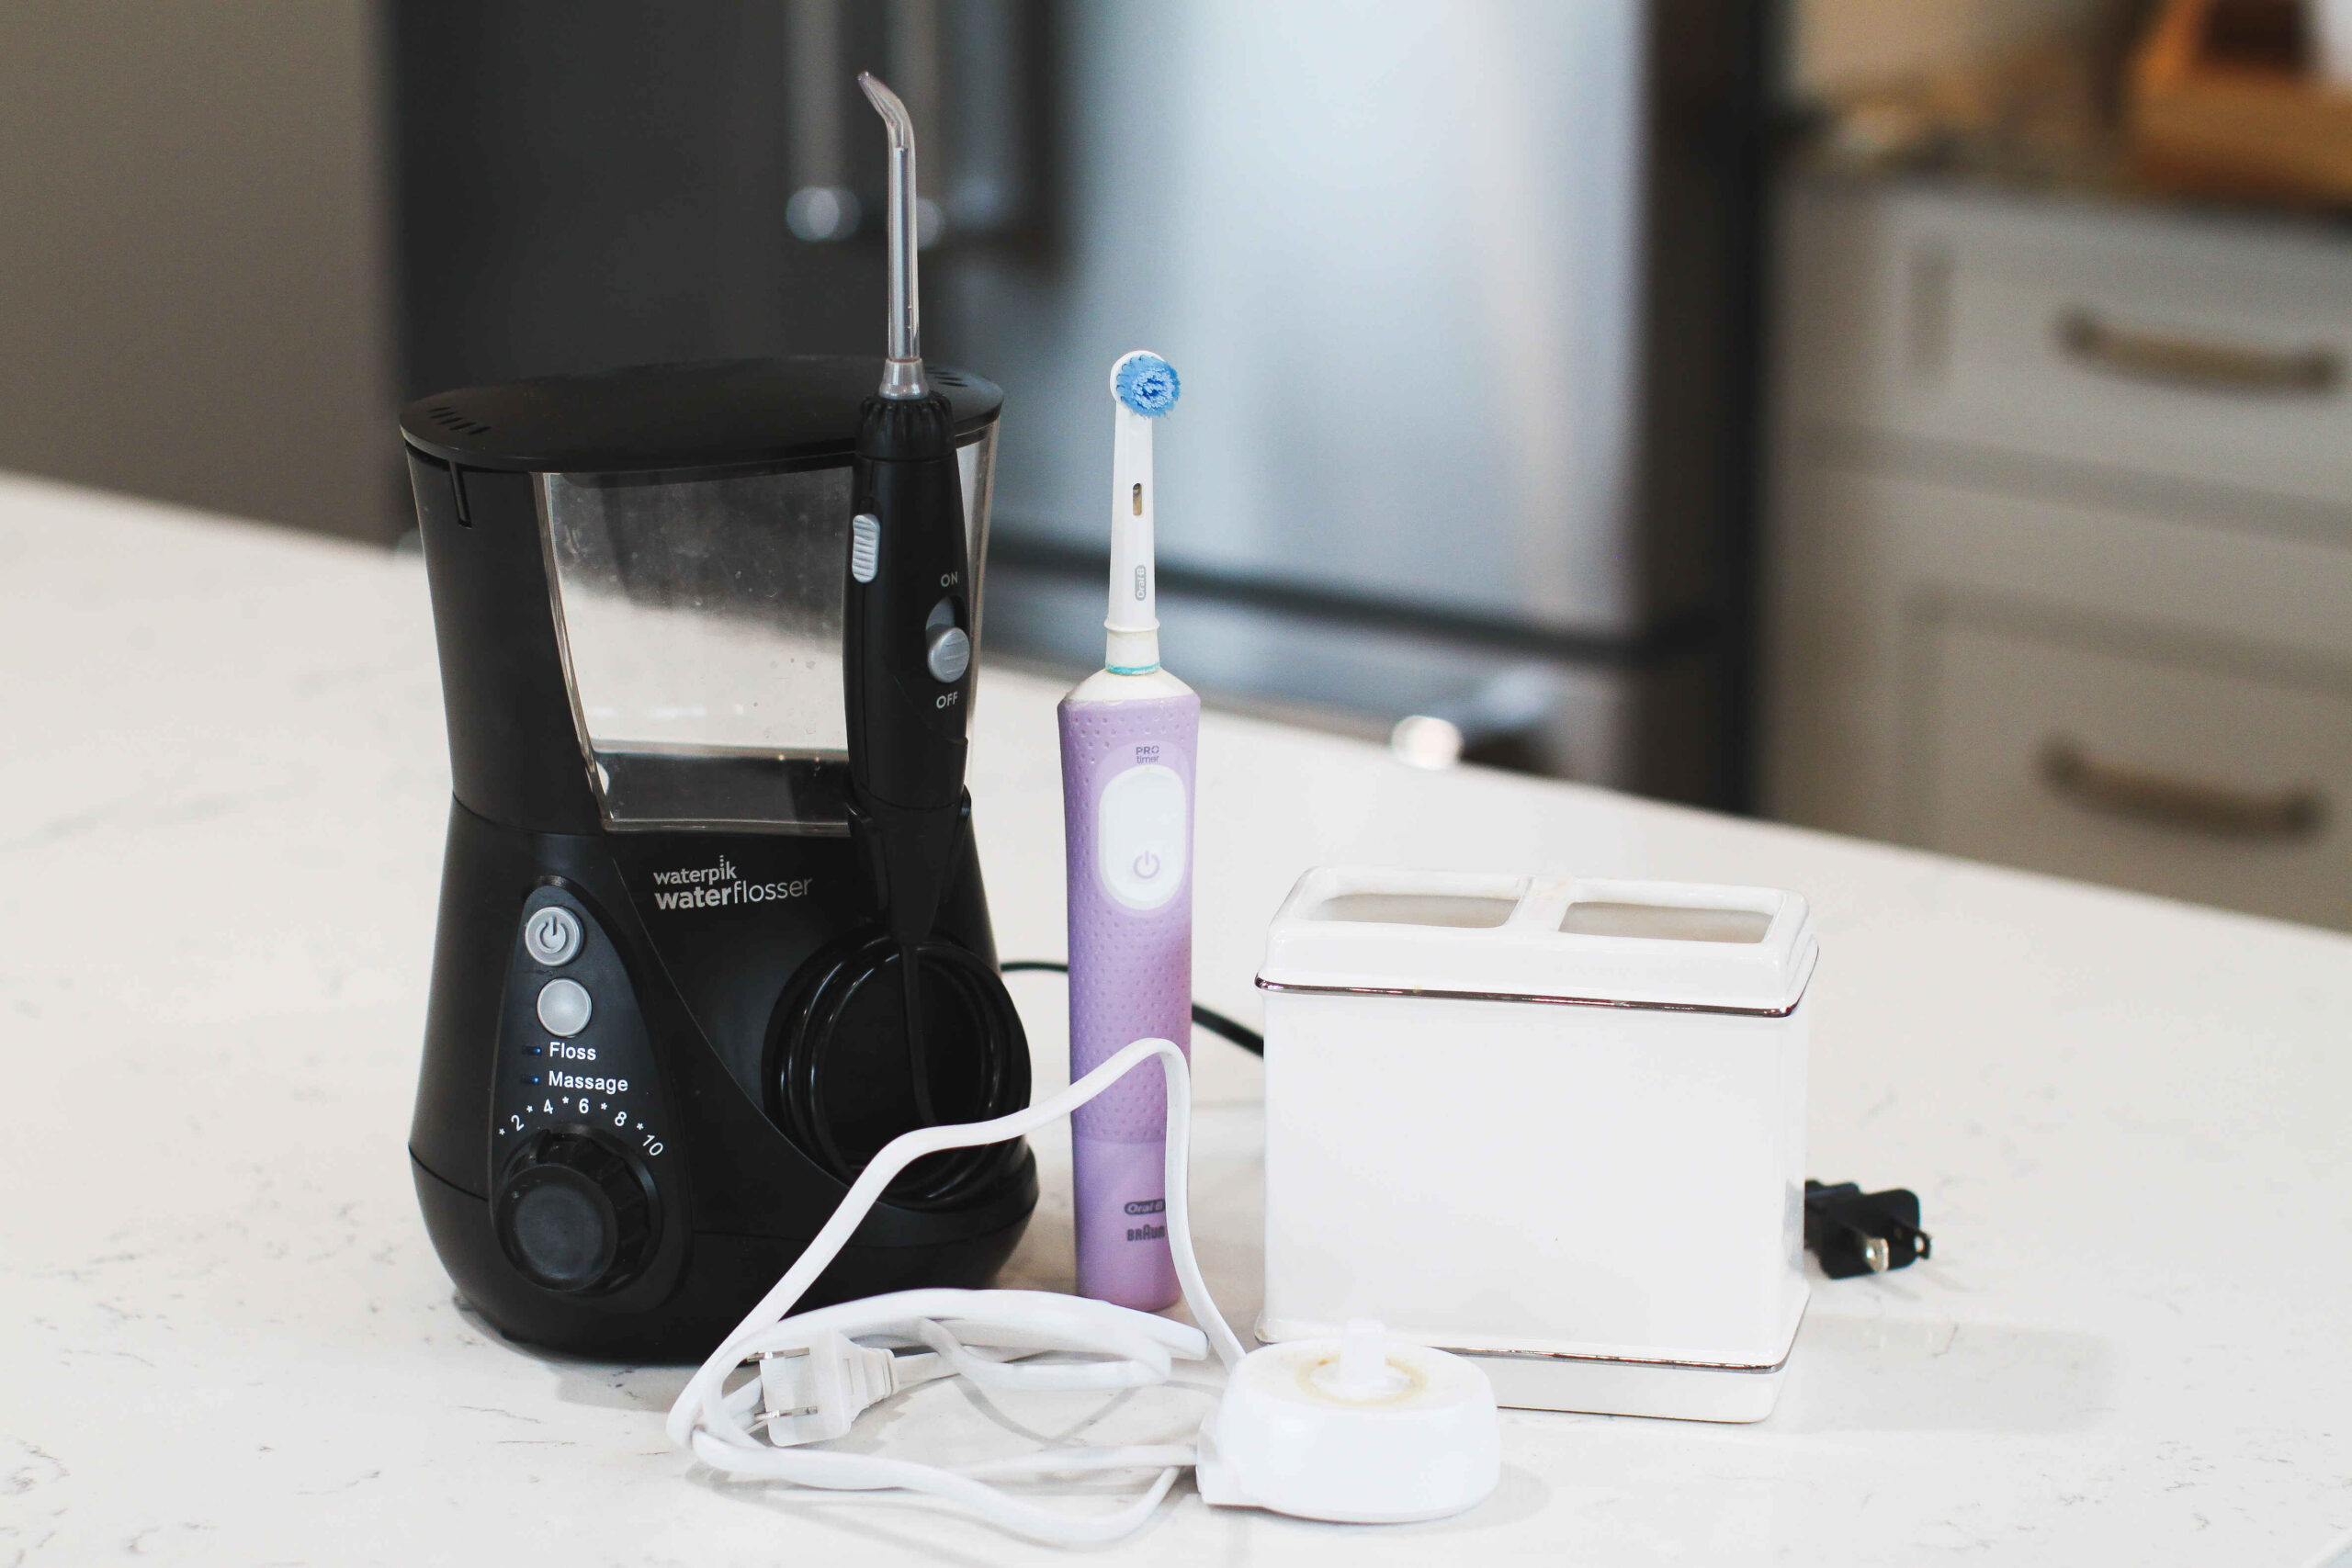
How to Clean Electric Toothbrushes, Chargers, Flossers & Holders
Cleanliness is key for a bright smile and healthy teeth. As house cleaners, we’ve seen a lot of dirty toothbrush holders, water flossers, and electric toothbrushes. Just think of all those germs… and these tools are used in our mouths *shudder*. This article shares simple tips to keep them clean and hygienic.
Electric Toothbrushes and Chargers
Electric toothbrushes:
You can’t get clean teeth without a clean toothbrush. Case in point: kids’ toothbrushes. They can get downright crusty. Try to get in the habit of rinsing your toothbrush in HOT tap water before and after brushing. But if you notice a buildup of toothpaste on your toothbrush, here’s how to fix that:
What you need:
- Bowl
- Soft scrub brush or microfiber cloth
- Optional: Antibacterial mouthwash or hydrogen peroxide
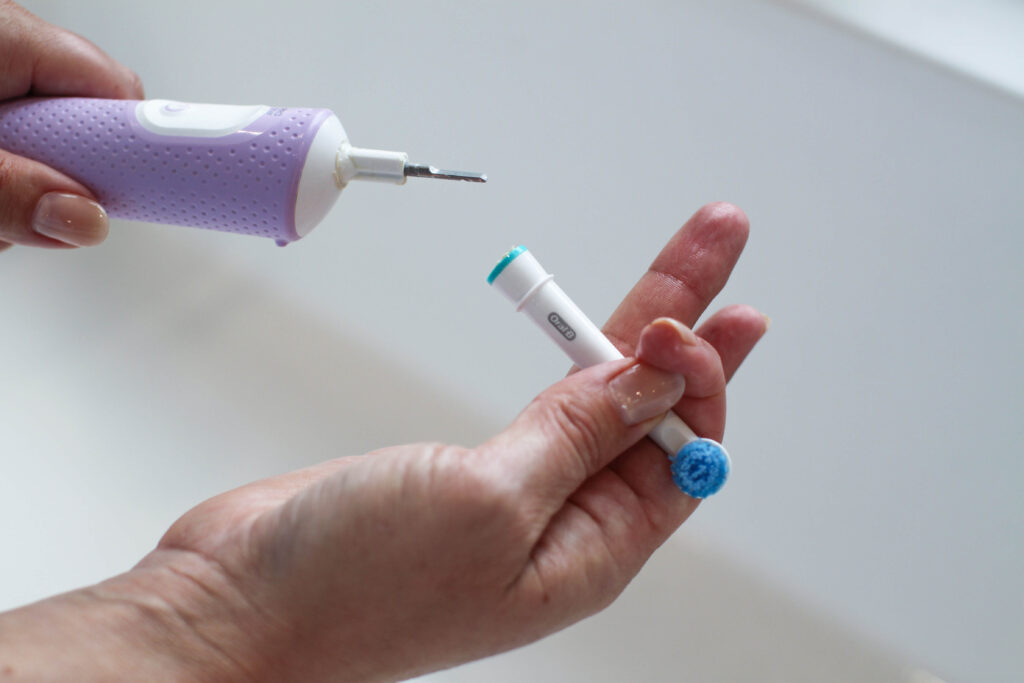
Step 1: Wash the head
Take the brush head off the handle and place it in a bowl of hot water to soak. After soaking, wipe off all the softened toothpaste with a cloth or scrub brush. If you want to disinfect the toothbrush head, you can soak it in antibacterial mouthwash or a mixture of 1 teaspoon hydrogen peroxide and 1 cup hot water for 15 minutes. Rinse with hot water before brushing.
Step 2: Wash the handle
Run the handle under hot water to soften any built-up gunk, then scrub it off with a soft scrub brush.
Step 3: Reassemble
Rinse both parts of the toothbrush, reassemble it, and then place it upright to dry.
Toothbrush chargers:
What you need:
- Powdered Tide®
- Bleach
- Optional: Clorox Disinfecting Bathroom Spray
- Microfiber cloth
- Small bowl
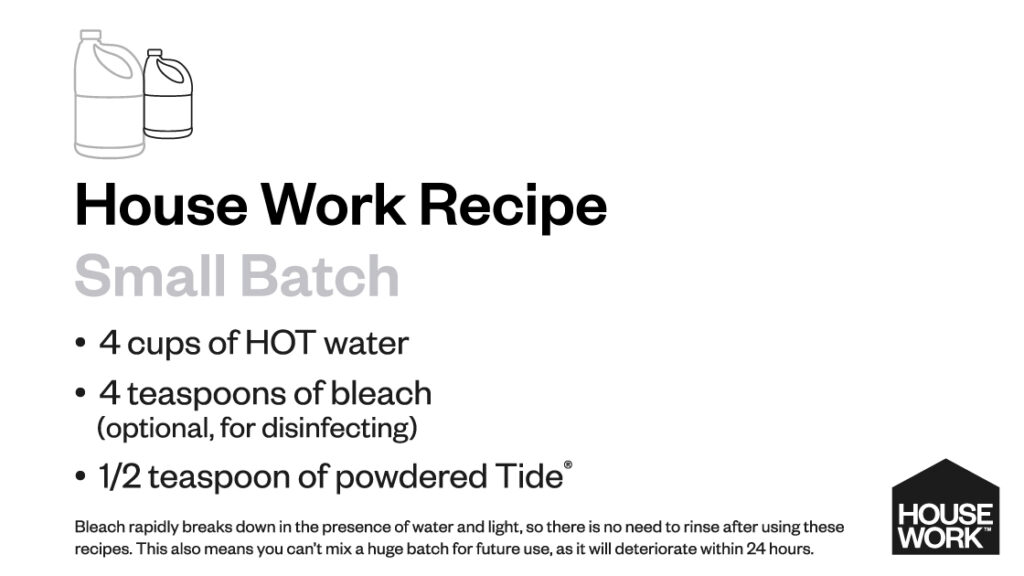
Mix a batch of our water, bleach and Tide® recipe in a small bowl, or use Clorox® Disinfecting Bathroom Spray.
Step 1: Get Cleaning
***Make sure the charger is unplugged before cleaning.
Spray the Clorox® or dip the microfiber cloth into the cleaning solution and gently scrub the entire surface of the electric toothbrush charger. Pay extra attention to crevices and corners where bacteria accumulate. While you are at it, wipe down the cord.
Step 2: Rinse and Dry.
Once thoroughly cleaned, wipe with a clean, damp cloth to remove any remaining cleaning solution. After rinsing, use a dry microfiber cloth to wipe the charger and let it air dry before plugging it back in.
Tip: If you notice hard water buildup after drying, pour vinegar on the base, let it sit until softened, then wipe it away.
Water Flossers
What you need:
- Powdered Tide®
- Bleach
- Small bowl
- Microfiber cloth or soft sponge
- Carbon cloth (optional)
- Blue Dawn® dish soap
- Soft-bristled brush
- White vinegar
- Optional: Hydrogen peroxide or a denture tablet
Step 1: Cleaning the Outside
Mix a batch of our water, bleach and Tide® recipe (above) in a small bowl. Remove the reservoir and dip a microfiber cloth or soft sponge into the mixture. Gently wipe down the exterior of the water flosser, including the base where the water reservoir sits. Pay close attention to areas with visible stains, splatters, or buildup. After cleaning, rinse the exterior with a clean, damp cloth to remove any remaining detergent residue. Use a carbon cloth to remove any streaks, if desired.
Tip: Use a soft-bristled scrub brush or an old toothbrush for particularly stubborn stains or residue.
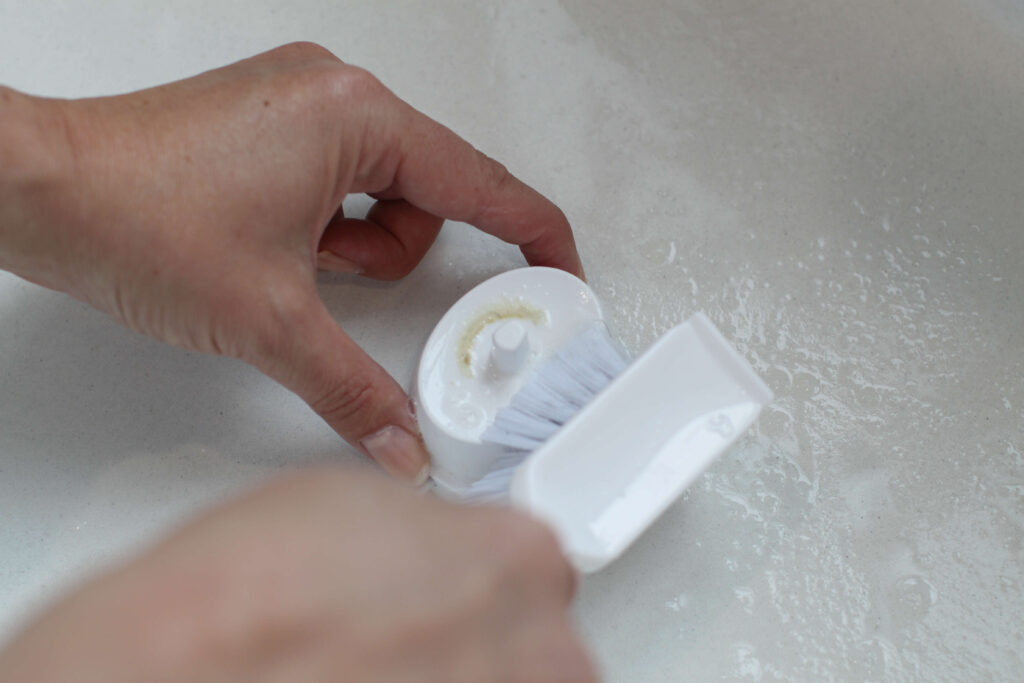
Step 2: Clean the Water Reservoir
Add a few drops of Dawn® dish soap to a sink full of warm water. Submerge the water flosser reservoir in the soapy water solution, fully covering it. Use a soft-bristled brush or the soft side of a sponge to scrub the interior of the reservoir. Consider areas where grime or buildup may be present, such as around the opening, along the sides, or the reservoir valve.
Once you’ve scrubbed the reservoir, rinse it thoroughly with clean water to remove any soap residue and loosened debris. Ensure that all soap suds are rinsed away.
Step 3: Hard Water Build-up
Fill your water reservoir with 1-2 tablespoons of white vinegar and warm water to the fill line on your model. This solution effectively breaks down hard water and mineral deposits.
Turn on the water flosser and run the mixture through the machine until the reservoir is completely empty. This helps clean the device’s internal components.
Refill the reservoir with warm water up to the fill line. Run the water flosser again until the reservoir is empty to rinse out any remaining vinegar solution and debris.
Note: Depending on how dirty the inside of your machine is, you may have to repeat this step until the water runs clean.

Step 4: Cleaning the Flosser Tips
There are three options for cleaning the flosser tips.
Option 1: Water and Hydrogen Peroxide Solution
Create a cleaning solution in a bowl using 2 parts water and 1 part hydrogen peroxide. This solution effectively disinfects and removes bacteria from the water flosser tips. Submerge the tips in the solution and let them soak for approximately 5 minutes, then rinse.
Option 2: White Vinegar Soak
Mix equal parts white vinegar and water in a container. Place the tips in the solution, allow them to soak for 5 minutes, then rinse. White vinegar helps dissolve mineral deposits but will not disinfect like the other options.
Option 3: Denture Tablet Soak
Dissolve one denture tablet in a container filled with warm water. Submerge the tips in the solution, let them soak for 5 minutes, then rinse. Denture tablets contain active ingredients that help break down stains and kill bacteria, leaving your tips fresh and hygienic.
Toothbrush Holders
We have three options for you again.
Option 1: Dishwasher Method
If your toothbrush holder is dishwasher-safe, this method is convenient and thorough. Place the toothbrush holder in the top rack of your dishwasher. Run the dishwasher on a hot water cycle to remove dirt, grime, and bacteria from the toothbrush holder.
Option 2: Water and Dawn® Solution
Alternatively, if you prefer to clean your toothbrush holder by hand or it is not dishwasher safe, you can use a mixture of water and Dawn® dish soap. Fill a sink with warm water and add a few drops of Dawn® dish soap. Submerge the toothbrush holder and use a soft-bristled brush or sponge to scrub away any residue or buildup. Pay special attention to crevices and hard-to-reach areas where bacteria may accumulate. Rinse the toothbrush holder and allow it to air dry before putting it back into use.
Option 3: Vinegar Soak
This method will work like a charm if your toothbrush holder has hard water deposits. Grab a bowl large enough to fit your toothbrush holder, and fill it with 1 part vinegar and 3 parts water. Submerge your toothbrush holder in the mixture and let it sit for 20 minutes, or until the hard water deposits have softened. Use a scrub brush to scrub away the deposits and grime. Once finished, rinse the holder under water then allow it to dry.
If you make a habit of cleaning your toothbrush holders and dental tools each time you clean your bathroom, the build-up won’t get so bad and it will be an easy task.
For more on bathroom cleaning, see here.
- Sara B @GoCleanCo


We're big on Instagram.
Follow @GoCleanCo for seriously satisfying videos and top-secret tips. Don’t be shy, come say hi.
gocleanco
494 2,457,048
Creating calm, clean homes.
Cleaning expert plus I do some other stuff which is always a wild ride
Comment link below and I’ll send you the link for the Zing and the brush attachment. The Bissell Zing is one of my favourite vacuums that comes in under $100 in both Canada and the US. You cannot beat this price for the suction and power this thing packs. It’s light weight enough to carry around, lift up high (or low) to get into hard to reach places, and the filter is washable, the canister is easy to empty. I pair it with the hair brush (you have to order it separately!) for dusting baseboards, bathrooms, shelves, basically everything. This vacuum is for hard floors only: It does not have a beater bar for carpets. Only downfall it has is that the cord is a little short and the stick floor attachment sometimes falls out so you have to ram it in there. For under $100 you can’t have it all but honestly this is as close as it gets for me.
Comment link below and I’ll send you the link for the Zing and the brush attachment. The Bissell Zing is one of my favourite vacuums that comes in under $100 in both Canada and the US. You cannot beat this price for the suction and power this thing packs. It’s light weight enough to carry around, lift up high (or low) to get into hard to reach places, and the filter is washable, the canister is easy to empty. I pair it with the hair brush (you have to order it separately!) for dusting baseboards, bathrooms, shelves, basically everything. This vacuum is for hard floors only: It does not have a beater bar for carpets. Only downfall it has is that the cord is a little short and the stick floor attachment sometimes falls out so you have to ram it in there. For under $100 you can’t have it all but honestly this is as close as it gets for me. ...
🫠🫠🫠
🫠🫠🫠 ...
GO-GO-GADGET ARM @swiffer
GO-GO-GADGET ARM @swiffer ...
Honestly we coulda kept going. ✨
Honestly we coulda kept going. ✨ ...
We took a poll and these are the most requested things Moms want for Mother’s Day. Did we miss anything? Send this to the people in your life who know how to make it happen! Also….most of these things are free—they just take some effort.
We took a poll and these are the most requested things Moms want for Mother’s Day. Did we miss anything? Send this to the people in your life who know how to make it happen! Also….most of these things are free—they just take some effort. ...
Sneaky surprise clean for my Mom for Mother’s Day! She deserved this so much, she has scrubbed a lot of houses with me over the years. Many of you may not know this but my Mom has tagged along and helped with cleaning and training the team since day one. She knows the entire team inside and out and we all love to call her “Mom”. She taught me how to clean, how to run a business and most importantly, how to stand on my own two feet. Then I took everything she taught me and turned it into ✨ THIS ✨
Happy Mothers Day Mom @sarahsmomtrudy
Sneaky surprise clean for my Mom for Mother’s Day! She deserved this so much, she has scrubbed a lot of houses with me over the years. Many of you may not know this but my Mom has tagged along and helped with cleaning and training the team since day one. She knows the entire team inside and out and we all love to call her “Mom”. She taught me how to clean, how to run a business and most importantly, how to stand on my own two feet. Then I took everything she taught me and turned it into ✨ THIS ✨
Happy Mothers Day Mom @sarahsmomtrudy ...
By popular request, I tried out the newest the new Mike Washoksi! He did not disappoint. This little pressure washer packs a big punch of power and cleaned up years of grime from this deck in about 20 mins. Now what else can I pressure wash 🤔 😈 Comment: Link and I will send the link to you IN DM!
By popular request, I tried out the newest the new Mike Washoksi! He did not disappoint. This little pressure washer packs a big punch of power and cleaned up years of grime from this deck in about 20 mins. Now what else can I pressure wash 🤔 😈 Comment: Link and I will send the link to you IN DM! ...
🪄✨
I used Mr. Clean undiluted, sprayed it on and let it sit for about ten minutes, scrubbed and wiped it off well to rinse. Letting your cleaning products sit is part of the process, they do a lot of the heavy lifting for you. I think many of us get discouraged with cleaning products because we spray and wipe immediately with minimal results…dirt and grease needs time to soften and break down before you can remove it. However, there is always a little bit (or a lot) of elbow grease required, nothing in life is free 🙃
🪄✨
I used Mr. Clean undiluted, sprayed it on and let it sit for about ten minutes, scrubbed and wiped it off well to rinse. Letting your cleaning products sit is part of the process, they do a lot of the heavy lifting for you. I think many of us get discouraged with cleaning products because we spray and wipe immediately with minimal results…dirt and grease needs time to soften and break down before you can remove it. However, there is always a little bit (or a lot) of elbow grease required, nothing in life is free 🙃 ...