


Holiday Storage Tips and Hacks to Keep Your Sanity
Picture this: It’s December 26th, and you are OVER IT. Christmas is dead to you, and you just want to pack it all away and get your clean, organized living space back. So you toss everything back into the same bins you’ve been using for 12 years with no rhyme or reason just to get it done quickly.
We’re here to remind you that MAYBE there is a better way. A way that will protect your investments and organize them in a way that will make next year’s setup a breeze.
When you buy through our links, we may earn a small commission.
Evaluate Your Current Holiday Storage
As you take out your decorations to set up for Christmas, the first thing you should do is evaluate your current storage situation. What works and what doesn’t? Are your bins in good shape, or are they cracking and breaking? Are they stored in a manner that is easy to access, or do you need to invest in some shelving (USA | Canada)? Is everything organized and labeled (USA | Canada), or are you hunting items down for an eternity? If you find that items are broken as you take them out or lights don’t work, then you need to do a better job packing them up. Consider yourself warned.
This is also a good time to take inventory of your Christmas decorations and holiday materials. Were all your possessions conveniently packed away last year, or did you have miscellaneous items spilling over in your basement? Did you acquire new items this year to add to your collection?
It’s hard to tell exactly what will fit in your current containers until you try, but do your best to estimate visually. If you end up needing more storage room, you’ll need to shop for some more containers (and if your existing containers are cracked or warped, some better options).
DIY Holiday Storage Hacks
Of course we are going to share some cool finds that will make things easy, but before you make that investment, we want to show you some of our favorite hacks and DIY storage solutions to help save you some dough.
1. Wrap your lights, garlands, and ribbon around scrap pieces of cardboard, or empty wrapping paper tubes (if you can stop your kids from using them as swords and destroying them first, that is). We love this hack because you probably already have empty wrapping paper tubes and other cardboard tubes floating around from the holidays. If you don’t, it’s only a matter of time before you empty a toilet paper or paper towel roll.
Pro Tip: cut a small slit in the side of the cardboard to tuck the end into, so that they don’t unravel. Once you practice this trick a few times, you’ll become a master at it.
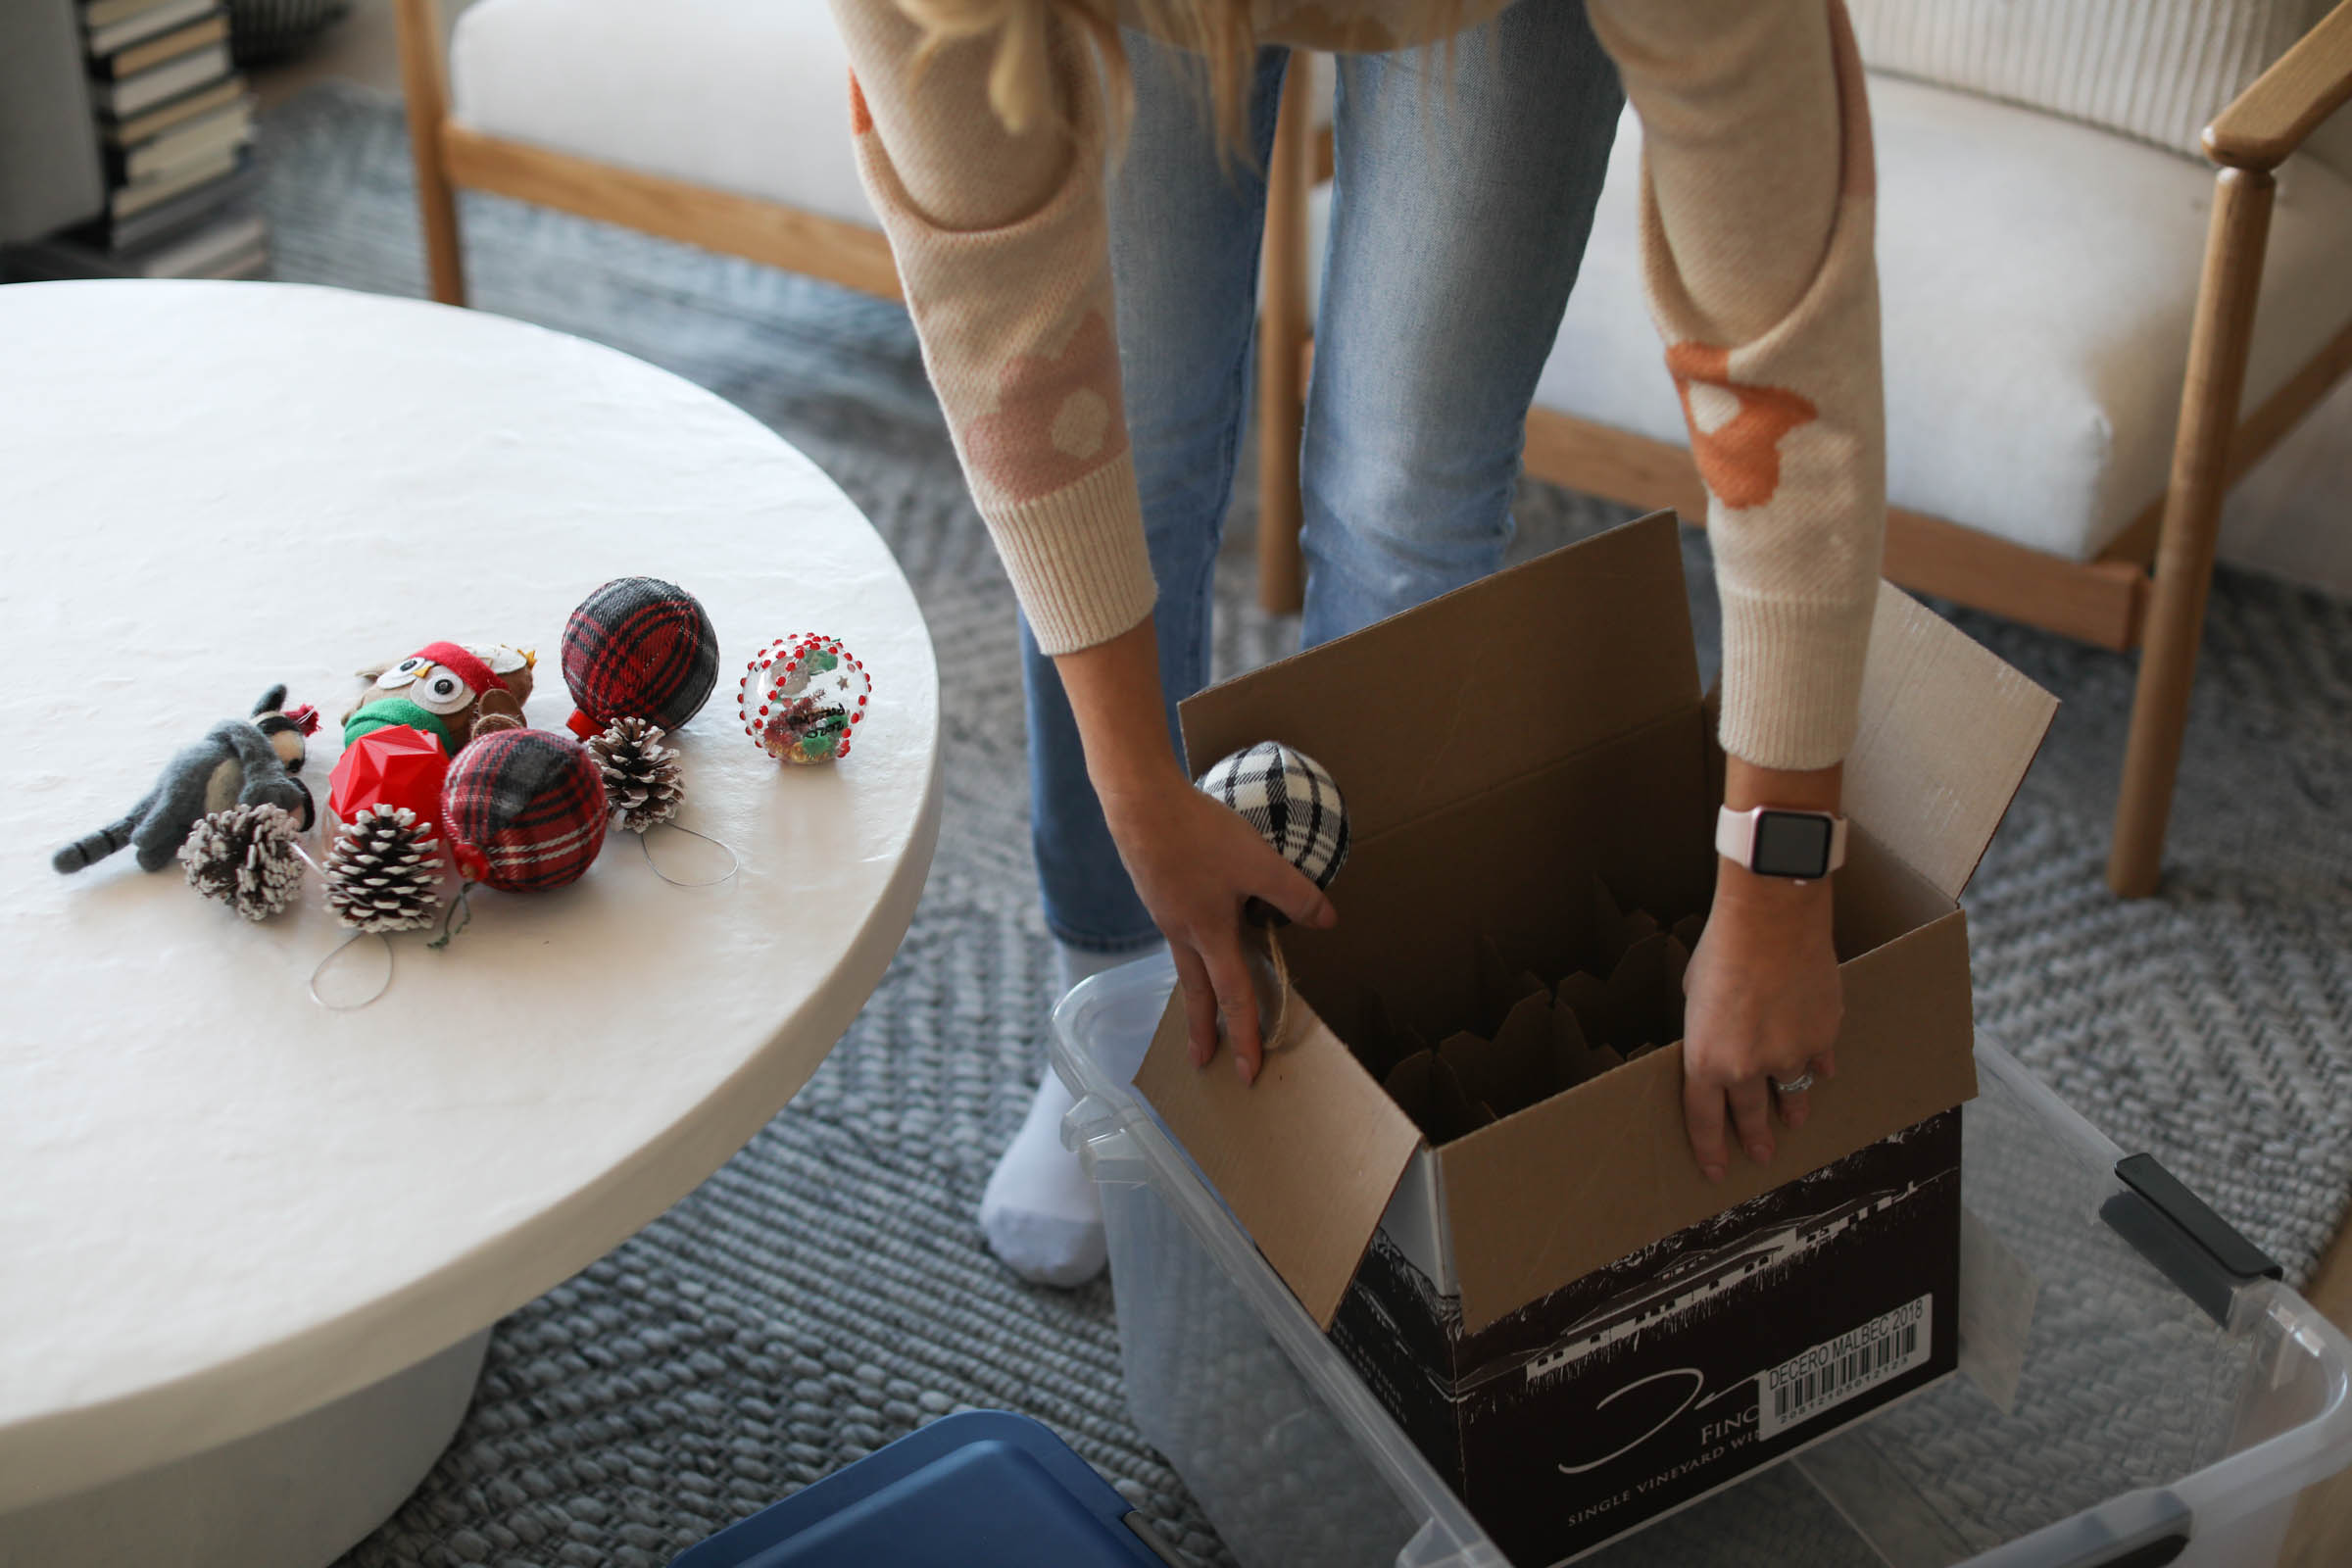
2. Use soft seasonal items like throw blankets, tablecloths, and dish towels, to protect your larger breakable items as you put them away. Wrap each item individually in dishcloths, or gradually incorporate more items into the surface area of a blanket. You can also use soft things like these to function as packing material, filling up the space within your container so things don’t move around; it’s great for preventing breakage next year when you carry these big boxes up and down the stairs.
3. Include more dividers. Whether you buy formal dividers or just scrap together your own, these thin partitions can help you keep things organized in every box you pack. For example, you can use simple cardboard sections to keep your wrapping paper, bows, ribbons, and name tags separate in the same container.
4. Reduce, reuse, recycle. Dig through your recycling before heading to the store to buy ornament storage. You might be surprised at some of the “trash” items that can be incredibly helpful when storing Christmas ornaments and decorations. Here are some items that are perfect for ornament storage:


- Egg cartons
- Beer/wine bottle boxes – they have built-in dividers to keep your ornaments safe.
- Solo cups
- Clear gallon Ziploc bags
All of the above items can be stacked into bins to keep everything together.
5. If you can keep your tree box in good shape, there’s no reason you shouldn’t keep using it. You might be able to get away with keeping your tree separate in your storage area, but if it’s in a box, it’s going to be far more likely to preserve its shape and luster.
6. Take advantage of vertical and hanging storage. If you’re storing all your Christmas materials in the basement or in a closet, you’ll quickly learn the limitations of your space. There are only so many bins you can stack and so many decorations you can stuff into a relatively small area. Instead of trying to cram in more, learn to take advantage of more vertical space. That could mean investing in wall shelves or using over-the-door hanging storage units for some of your most important décor items.
7. Utilize clear garment bags. Do you do a lot of dry cleaning? If so, you probably have at least a handful of leftover garment bags sitting around. These bags are great for protecting wreaths, small trees, and other large decorations that wouldn’t ordinarily fit in a storage container or box.
Online Finds that Save the Day
If budget allows, we found some really handy storage solutions to make your life easier. Here are some of our favorites:

- Tree storage bags. (USA | Canada) Make sure these are good and sturdy so they last more than a year, and be sure to buy the right size for your tree. Not too big, not too small.
- Ornament storage bags. (USA | Canada) Don’t go flimsy, or you’ll risk breaking ornaments.
- Wreath / Garland storage bags (USA | Canada)
- Wrapping paper storage bags. (USA | Canada) Again, don’t skimp on quality here either. We made the mistake of buying a cheaper one with soft sides and ended up having to re-buy a better one. Lesson learned. There’s also a compartment for gift bags and tissue if you like to reuse those.
- Light Holders / reels. (USA | Canada)
- Clear bins. (USA | Canada) SO helpful to be able to see what is inside at a glance.


Hopefully these tips will help make decorating and pulling down decorations easy peasy each year. In addition, protect your investments and Christmas memorabilia for years to come.
See all our favorite Holiday storage and organization tools: (USA | Canada)
- Becky @GoCleanCo
We're big on Instagram.
Follow @GoCleanCo for seriously satisfying videos and top-secret tips. Don’t be shy, come say hi.
gocleanco
569 2,578,166
Sarah McAllister
Collabs: [email protected]
Cleaning expert plus I do some other stuff which is always a wild ride
What’s in my purse, but really it’s my caddy.
Comment LINK and I’ll send you a list of everything I use.
What’s in my purse, but really it’s my caddy.
Comment LINK and I’ll send you a list of everything I use. ...
SOMPWM (sit on my porch with me)
Comment LINK and I’ll send you a list of everything I used.
SOMPWM (sit on my porch with me)
Comment LINK and I’ll send you a list of everything I used. ...
Tune into my @amazonlive today at 12 pm MTN and 2 pm EST. I’m showing a bunch of bedroom finds I got for my sisters new house. Comment LINK and we’ll send you the link to the livestream and all the stuff I used! #ad
Tune into my @amazonlive today at 12 pm MTN and 2 pm EST. I’m showing a bunch of bedroom finds I got for my sisters new house. Comment LINK and we’ll send you the link to the livestream and all the stuff I used! #ad ...
How to Clean Baseball Pants:
Regular cycle (with hot water)
Laundry detergent (I used powdered Tide)
Add in 1/3 cup of OUT White Brite
Soak for one hour
Finish cycle
Dry
*If you don’t have a top loader, do the one hour soak in the sink or a bucket, wash as normal
If you want the link to the Out White Brite comment LINK and I’ll dm it to you ⚾️
How to Clean Baseball Pants:
Regular cycle (with hot water)
Laundry detergent (I used powdered Tide)
Add in 1/3 cup of OUT White Brite
Soak for one hour
Finish cycle
Dry
*If you don’t have a top loader, do the one hour soak in the sink or a bucket, wash as normal
If you want the link to the Out White Brite comment LINK and I’ll dm it to you ⚾️ ...
Come watch my @amazonlive today at 10 am MTN/12 pm EST. Comment link and I’ll send you the link to watch OR you can search “Shop the Show” on the app. You can also find me on the Amazon Live Fast Channel — found on your Prime TV app 😎#ad
Come watch my @amazonlive today at 10 am MTN/12 pm EST. Comment link and I’ll send you the link to watch OR you can search “Shop the Show” on the app. You can also find me on the Amazon Live Fast Channel — found on your Prime TV app 😎#ad ...
Happy Mother’s Day, I hope you get what you want this year 💕
Happy Mother’s Day, I hope you get what you want this year 💕 ...
You guys come watch my @amazonlive ! They are fun and we get to review all the my fav things. Comment LINK and I’ll send it over. I’m going live today @ 11 am MST/ 1 pm EST and reviewing your top pics for Mothers Day #ad
You guys come watch my @amazonlive ! They are fun and we get to review all the my fav things. Comment LINK and I’ll send it over. I’m going live today @ 11 am MST/ 1 pm EST and reviewing your top pics for Mothers Day #ad ...
Just putting it out there 🌸🌷
Just putting it out there 🌸🌷 ...