


9 Steps to a Sparkling Bathroom
It may sound crazy, but bathrooms are my favorite room to clean, most days.
Why? Because it’s the most straightforward and most satisfying room in the house.
A clean bathroom causes a ripple effect. Other rooms feel like a breeze once the bathrooms are done. Bathrooms are also where most bacteria and viruses live, so you must set aside time to perform a top-to-bottom clean every three weeks, at the very least.
Safety pit stop: There are a few rules about bathrooms around here. Always wear gloves, and run your fan or open a window. We don’t mix chemicals around here! Read your labels. Wipe with warm water between changing from one chemical to another.
When you buy through our links, we may earn a small commission.
Step #1 Clear the room.
Clear your countertops and shower or tub so that you can properly clean all the surfaces. In clients’ homes, we use an empty laundry basket or bin. Line it with paper towels and fill it with accessories and bottles so they are out of the way. Give them a rinse or wipe down before you put them back.
Step #2 Vacuum the ENTIRE bathroom.
Using your vacuum (USA | Canada) with a horsehair brush (USA | Canada), move through the room from left to right, top to bottom. All that dust and hair would become mud once wet and create more work for yourself.
Pro Tip: Don’t forget the ceiling fan cover. Usually, a quick vacuum is sufficient, but you might need to take it off to clean it well if it’s been a while.

Step #3 Tackle the toilet.
Remove the toilet seat if you can. Even if you need a screw driver… it’s always nasty under there.
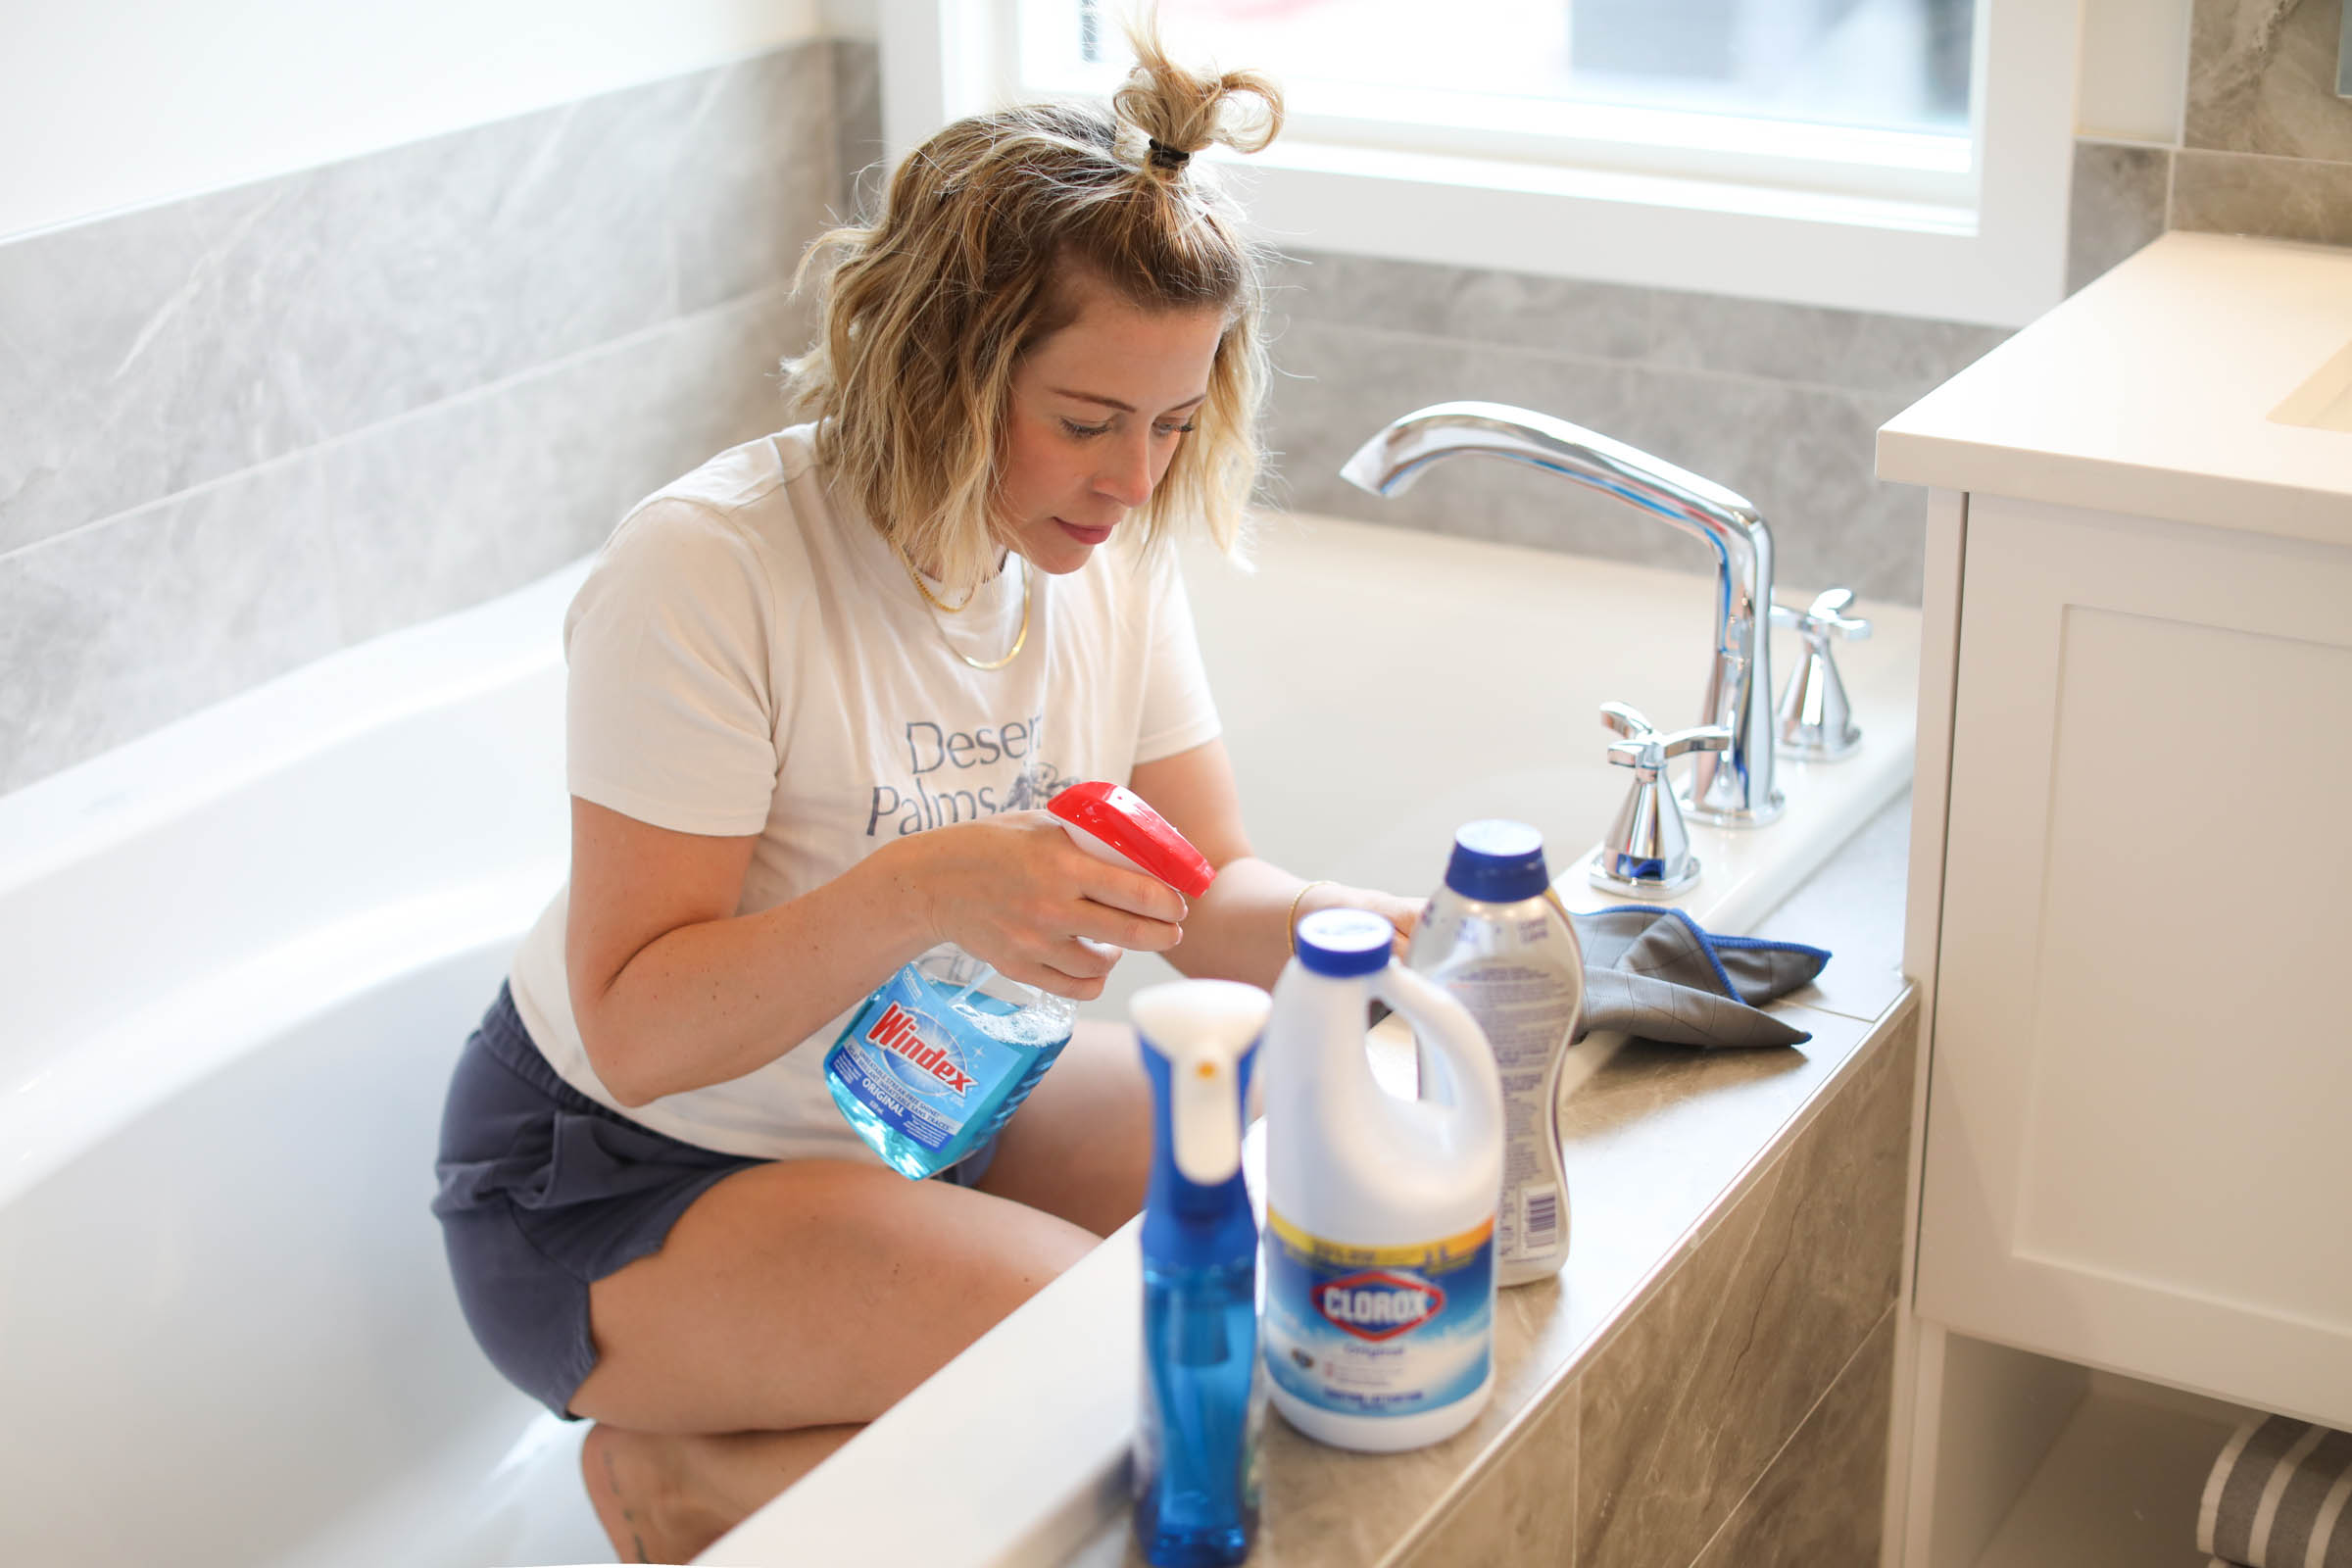
Start with disinfecting. (Who wants to scrub a germy toilet?!) Using our WBT (water, bleach and Tide®) recipe (1 gallon of hot water, ⅓ cup of bleach, 1 teaspoon of powdered Tide®) or Clorox® Clean-Up (USA | Canada) and a microfibre cloth, wipe down the entire toilet. We all have our favorite products, use what you have on hand first.
Next, spray bolt covers and any crevasses with Clorox® Clean-Up and use your scrub brush or an old toothbrush to get the gunk out from underneath.
Pour toilet bowl cleaner (USA | Canada) into the bowl and use your toilet brush to scrub away the offending stains.
Lastly, polish the outside of the toilet with Windex® (USA | Canada) and a fresh cloth to make your throne shine.
Pro tip: Close the toilet seat on your toilet brush to let it drip dry.
Step #4 Shower and tub time.
Hard water buildup on the shower head or faucet can be easily addressed with a bag of vinegar. (See this article for more tips on dealing with hard water) Secure the bag over the shower head or faucet using a rubber band, making sure it is fully submerged in the liquid. Remember, some products need time to work their magic, so this may need to sit overnight.
Tackle soap scum, gunk, and shower grout using a scrub brush with your WBT recipe (we also love Scrubbing Bubbles® (USA | Canada)). If your shower is marble, do not use bleach! Bleach has a high pH which will cause dull and light spots on marble. Once you’ve scrubbed everything, RINSE thoroughly. Use Bar Keepers Friend® on any stains that need some extra help!
Spray shower doors and fixtures with the shower door recipe (1 cup white vinegar and 2 tablespoons of blue Dawn® (USA | Canada) mixed in a spray bottle). Allow this to sit if stains are really bad. Once the build-up has softened, scrub the shower door with a soft sponge. Do not use anything abrasive because these doors are easily scratched. Rinse very well, then squeegee to remove the excess water.
Once the acrylic and glass are clean and dry, follow up with Windex® and a dry cloth for a flawless shine.
Pro Tips: If you don’t have a removable shower head grab a Tupperware or bowl from the kitchen for rinsing.
Don’t forget the high ledges and the OUTSIDE of the tub!
Step #5 Light fixtures.
See this article if your light fixtures need more than a simple dust and shine. Use Windex® on a microfibre cloth to clean and polish.
Warning: Make sure lights are turned off and have cooled down before cleaning. The moisture and heat can cause them to shatter.
Step #6 Walls and Doors.
Wipe the walls, doors, and baseboards with your WBT recipe and a microfibre cloth. Make sure to look UP AND AROUND. The ledge above the door and door sides are often missed. Use Mr. Clean® Summer Citrus (USA | Canada) for some extra help degreasing door hinges! Any stains that do not come off using WBT may come off with a Mr. Clean Magic Eraser®. Re-wipe if there is any visible residue.
Use the same mixture of WBT to wipe light switches and power outlets, using caution to ensure you don’t electrocute yourself. The exterior of cabinetry can also be cleaned with this mixture.
Pro Tip: Once disinfecting has been handled, use Windex® to polish door and cabinet handles.
Step #7 Counters and Sink.
Bar Keepers Friend® (USA | Canada) or WBT works great for sinks and faucets! First, use a cloth to cover everything with the product and then scrub it with a brush. Don’t forget the overflow hole! Rinse it off and dry with a microfibre cloth, which will polish at the same time. Use WBT on counters, omitting the bleach if counters are marble or copper. Follow up with Windex® for shine.
Pro Tip: Patience is required in the bathroom. If a product isn’t doing its job, it may just need time to sit!

Step #8 Mirror mirror on the wall.
Start by spraying the mirror with Windex® and wiping with a paper towel. Repeat until the paper towel comes clean, removing streaks with a slightly damp (water or Windex®) carbon cloth (USA | Canada) or microfiber cloth. If toothpaste splatter is giving you a hard time, hit it with some water, bleach and Tide®.
Pro tip: Turn off the light while you polish the mirror. The heat from the light bulbs creates a streaky film. When polished and dry, turn the light back on and check for touch-up spots, looking at the mirror from different angles and with different lighting. Turn the light off again for touch-ups.

Step #9 Floors.
Vacuum AGAIN. Remember, dust turns to mud when wet. For bathrooms, we hand wash the floors with a microfibre cloth to get into all the corners and do a thorough job. Use our WBT recipe on your floors (unless they are marble, then leave out the bleach). If your grout is discolored, use the WBT recipe with a scrub brush. Bleach is the key here because it helps lift grout stains and tackle discoloration. Vacuum again once dry for a perfect finish!
Finishing Touches
We love the finishing touches. Stage your bathroom by rolling or folding clean towels on racks. Heck, even fold your toilet paper in a fancy way!
Once you are done, close the door and reward yourself. The nastiness of cleaning your bathroom is over. Now that you’ve deep cleaned your bathroom, the upkeep will be SO much easier.
Clean Your Home the House Work Way
No need to stop with your bathrooms! Go ahead and clean your entire house!! And, while you’re at it, grab a copy of our House Work Cleaning Guide for our exact process for cleaning each room in your home.
For a list of our favorite products, click here.

We're big on Instagram.
Follow @GoCleanCo for seriously satisfying videos and top-secret tips. Don’t be shy, come say hi.
gocleanco
576 2,580,972
Sarah McAllister
Collabs: [email protected]
Cleaning expert plus I do some other stuff which is always a wild ride
Come find my custom DIRTY SODA on the Secret Influencer Menu at the @covet.sips.sweets at the Calgary Stampede from July 3–12.
Dirty Bastard by @gocleanco
• Coke Zero, extra ice
• A splash of fresh raspberry purée
• A splash of peach purée
• Two fresh lime wedges
• Finished with a drizzle of coconut cream
It’s sweet, tart, creamy, fizzy — tastes just like summer.
If you’re headed to Stampede, order my Dirty Soda, you dirty bastards. 🤠🥤
#CalgaryStampede #DirtySoda #Stampede2026
Come find my custom DIRTY SODA on the Secret Influencer Menu at the @covet.sips.sweets at the Calgary Stampede from July 3–12.
Dirty Bastard by @gocleanco
• Coke Zero, extra ice
• A splash of fresh raspberry purée
• A splash of peach purée
• Two fresh lime wedges
• Finished with a drizzle of coconut cream
It’s sweet, tart, creamy, fizzy — tastes just like summer.
If you’re headed to Stampede, order my Dirty Soda, you dirty bastards. 🤠🥤
#CalgaryStampede #DirtySoda #Stampede2026 ...
Screen time said I averaged 25 hours a day….wut
Screen time said I averaged 25 hours a day….wut ...
Its tiiiiiiiiiiiiiiiiime!!!!!!!!!!!!!!
*something glitched in the workshop had to repost —Santa Sarah 🎅🏻
Its tiiiiiiiiiiiiiiiiime!!!!!!!!!!!!!!
*something glitched in the workshop had to repost —Santa Sarah 🎅🏻 ...
Come watch my @amazonlive today at 11 am MTN/1 PM EST as we show off the best deals for PRIME DAYS — my elves are here helping me 😉
COMMENT LINK and I’ll send you the link to watch.
I am also on the Amazon Live Fast Channel today!
To watch the Amazon Live channel, just open Prime Video on your TV and search Amazon Live…
You can also watch on fire TV channels and the lifestyle section…
And now Amazon live is available on Samsung TV Plus!!! Find us in the home and food category or search Amazon Live on your Samsung Smart TV #ad
Come watch my @amazonlive today at 11 am MTN/1 PM EST as we show off the best deals for PRIME DAYS — my elves are here helping me 😉
COMMENT LINK and I’ll send you the link to watch.
I am also on the Amazon Live Fast Channel today!
To watch the Amazon Live channel, just open Prime Video on your TV and search Amazon Live…
You can also watch on fire TV channels and the lifestyle section…
And now Amazon live is available on Samsung TV Plus!!! Find us in the home and food category or search Amazon Live on your Samsung Smart TV #ad ...
We have went through the Prime Day Deals with a fine tooth comb. 😮💨 Lots of my top rated and reviewed products are on sale for Prime Days June 23-26 on @amazonca
Comment LINK below and we will send you the round up of all the best deals 👌🏻
We have went through the Prime Day Deals with a fine tooth comb. 😮💨 Lots of my top rated and reviewed products are on sale for Prime Days June 23-26 on @amazonca
Comment LINK below and we will send you the round up of all the best deals 👌🏻 ...
I stuffed a Hulken Bag for you.
Comment below to win it. 🫡
If you want a link to anything in here, comment: LINK
*this give away is not affiliated with Meta
I stuffed a Hulken Bag for you.
Comment below to win it. 🫡
If you want a link to anything in here, comment: LINK
*this give away is not affiliated with Meta ...
Corners of my home made cozy from @amazonca
Lots of these products are on sale for Prime Days June 23-26!
Comment LINK below and we will send you the round up! #amazoncanada #amazonhomefinds #primedaydeals
Corners of my home made cozy from @amazonca
Lots of these products are on sale for Prime Days June 23-26!
Comment LINK below and we will send you the round up! #amazoncanada #amazonhomefinds #primedaydeals ...
What’s in my purse, but really it’s my caddy.
Comment LINK and I’ll send you a list of everything I use.
What’s in my purse, but really it’s my caddy.
Comment LINK and I’ll send you a list of everything I use. ...