


Garden Tool Organization: Keep Your Shed Tidy and Your Tools Easy to Find
If opening your shed means dodging a rake, untangling a hose, and digging through a pile of flower pots just to find your trowel, it’s probably time for a reset.
A little organization makes gardening more enjoyable, helps your tools last longer, and saves you from buying duplicates because you couldn’t find the one you already own. The best part? You don’t need a fancy shed makeover. A few simple systems can make a big difference.
Start by Cleaning Your Tools
Before you organize anything, give your tools a quick clean.
Brush off dirt, mud, and grass, then wash away any stubborn grime with warm water and a little dish soap. Once they’re clean, dry everything thoroughly before putting it away.
There’s no point organizing tools that are still covered in dirt.
Declutter Before You Organize
Garden sheds have a way of collecting things we don’t actually use.
Take a few minutes to sort through everything and get rid of:
- Broken tools that can’t be repaired
- Duplicate tools you never reach for
- Cracked pots and seed trays
- Empty bags, broken plant markers, and other odds and ends that have accumulated over the years
The less you’re storing, the easier it is to keep everything organized.
Group Similar Items Together
Instead of storing things wherever they happen to fit, create simple categories.
For example:
- Hand tools like trowels and hand forks
- Long-handled tools like rakes, shovels, and hoes
- Watering supplies (you may know we love this expandable hose (USA | Canada))
- Pots and planters
- Gloves and kneeling pads
- Plant labels, twine, and other small accessories
Spend less time digging through your shed and more time digging in your garden.
Create a Home for Everything
You don’t need a custom-built garden shed or an expensive organization system to keep your tools tidy. The goal is to give every item a designated place so it’s easy to find and easy to put away.
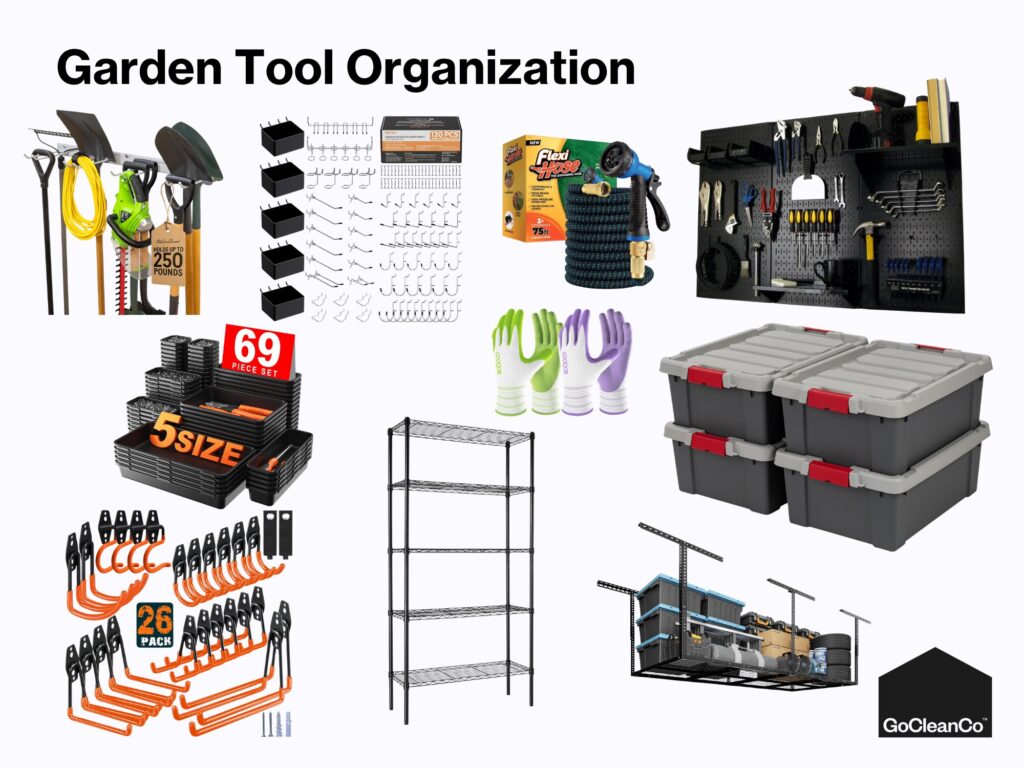
Make the most of your wall space by hanging long tools on hooks or a wall-mounted rack instead of leaning them into a corner where they fall over. Pegboards are great for smaller hand tools, while shelves, baskets, or labeled bins help keep gloves, twine, plant labels, and other accessories organized.
Some of our favorite organization products include:
- Heavy-duty wall hooks (USA | Canada)
- Garden tool wall racks (USA | Canada)
- Pegboard storage systems (USA | Canada)
- Storage bins and baskets
- Utility shelving (USA | Canada)
- Small parts organizers
- Tool totes or bucket organizers
See all our top picks on Amazon here: (USA | Canada)
As an Amazon Associate I earn from qualifying purchases.
You don’t need to buy everything at once. Even adding a few hooks and giving each tool a home can completely change how your shed functions.
A Few Habits That Help Your Tools Last Longer
You don’t need to spend hours maintaining your garden tools, but a little care goes a long way.
Before putting them away:
- Brush off dirt and debris.
- Make sure they’re completely dry.
- Wipe metal parts with a light coat of oil every so often to help prevent rust.
- Keep cutting tools sharp so they’re ready when you need them.
- Avoid leaving tools outside between gardening sessions whenever possible.
A few minutes of maintenance now can help your tools last for years.
Frequently Asked Questions
How do you organize garden tools in a small shed?
Use your wall space whenever possible. Hooks, pegboards, and shelves keep tools off the floor and make the most of a small space.
Should garden tools be cleaned before storing?
Yes. Removing dirt and moisture helps prevent rust and keeps your storage space much cleaner.
What’s the best way to store long-handled garden tools?
Hang them on sturdy hooks or a wall-mounted rack instead of leaning them in a corner where they can fall over or become difficult to access.
How can I keep garden tools from rusting?
Store them clean and completely dry, and occasionally wipe the metal parts with a light coat of oil to help protect them from moisture.



We're big on Instagram.
Follow @GoCleanCo for seriously satisfying videos and top-secret tips. Don’t be shy, come say hi.
gocleanco
581 2,583,297
Sarah McAllister
Collabs: [email protected]
Cleaning expert plus I do some other stuff which is always a wild ride
How to clean a silgranit sink.
Comment SINK and I’ll send you the cleaning method for all the other sinks 📖
How to clean a silgranit sink.
Comment SINK and I’ll send you the cleaning method for all the other sinks 📖 ...
Things that are worth the money: Cleaning Edition
Things that are worth the money: Cleaning Edition ...
Don’t tell @sarahsmomtrudy 👀
Don’t tell @sarahsmomtrudy 👀 ...
How to clean your bins and keep bugs and animals out of them.
One step I forgot to show here was I poured some Pine-Sol in the bottom of the bins to soften the gunk and filled with a bit of water and let them soak for an hour in the sun!
how to keep flies out of trash, how to clean trash and garbage bins
How to clean your bins and keep bugs and animals out of them.
One step I forgot to show here was I poured some Pine-Sol in the bottom of the bins to soften the gunk and filled with a bit of water and let them soak for an hour in the sun!
how to keep flies out of trash, how to clean trash and garbage bins ...
Monday morning ☕️ anyone?
Monday morning ☕️ anyone? ...
Come find my custom DIRTY SODA on the Secret Influencer Menu at the @covet.sips.sweets at the Calgary Stampede from July 3–12.
Dirty Bastard by @gocleanco
• Coke Zero, extra ice
• A splash of fresh raspberry purée
• A splash of peach purée
• Two fresh lime wedges
• Finished with a drizzle of coconut cream
It’s sweet, tart, creamy, fizzy — tastes just like summer.
If you’re headed to Stampede, order my Dirty Soda, you dirty bastards. 🤠🥤
#CalgaryStampede #DirtySoda #Stampede2026
Come find my custom DIRTY SODA on the Secret Influencer Menu at the @covet.sips.sweets at the Calgary Stampede from July 3–12.
Dirty Bastard by @gocleanco
• Coke Zero, extra ice
• A splash of fresh raspberry purée
• A splash of peach purée
• Two fresh lime wedges
• Finished with a drizzle of coconut cream
It’s sweet, tart, creamy, fizzy — tastes just like summer.
If you’re headed to Stampede, order my Dirty Soda, you dirty bastards. 🤠🥤
#CalgaryStampede #DirtySoda #Stampede2026 ...
Screen time said I averaged 25 hours a day….wut
Screen time said I averaged 25 hours a day….wut ...
Its tiiiiiiiiiiiiiiiiime!!!!!!!!!!!!!!
*something glitched in the workshop had to repost —Santa Sarah 🎅🏻
Its tiiiiiiiiiiiiiiiiime!!!!!!!!!!!!!!
*something glitched in the workshop had to repost —Santa Sarah 🎅🏻 ...