


How To Clean Between Your Oven Door Glass
We’ve taught you how to deal with your oven and the door itself, but what about the inside of the glass on the door? It’s prone to drip marks, and it can drive you crazy when the rest of your oven is clean. Let’s dive in!
When you buy through our links, we may earn a small commission.
What you’ll need:
- A towel
- EasyOff® Oven cleaner
- SOS® pads
- Windex®
- Paper towel
- Dawn® Powerwash
- Screwdrivers

*This method will vary depending on your model of oven. Check your warranties and contact your manufacturer if needed*
Before you get started, gather your tools and cleaning supplies. Nothing is worse than starting a job and realizing you don’t have the right products to finish the job. Depending on the severity and age of drips you might need oven cleaner or you might get away with a simple spray of Dawn® Power Wash. Have an SOS® pad or two, along with Windex®, paper towels and/or a carbon polish cloth.
You will need a screwdriver for this task. Before removing the door check the screw heads on the interior of the oven door. Are they x shaped (phillips), a square (robertson) or a straight slot (slotted/ flat head)? Screwdrivers not only come in different styles but they also come in different sizes. Before you remove your oven door ensure you have the right screwdriver handy. DO NOT attempt to use the wrong style or size. You could end up stripping your screws…and then well you will be screwed. These screws are specific to your oven; you can’t pick them up at any hardware store. So play it safe and do it right.
1. First, lay a towel down on your kitchen counter to avoid any scratches or chips.
2. You need to remove the door from the oven itself. Most ovens have hinge locks on each side of the door. You can release the latch with a butter knife or flathead screwdriver

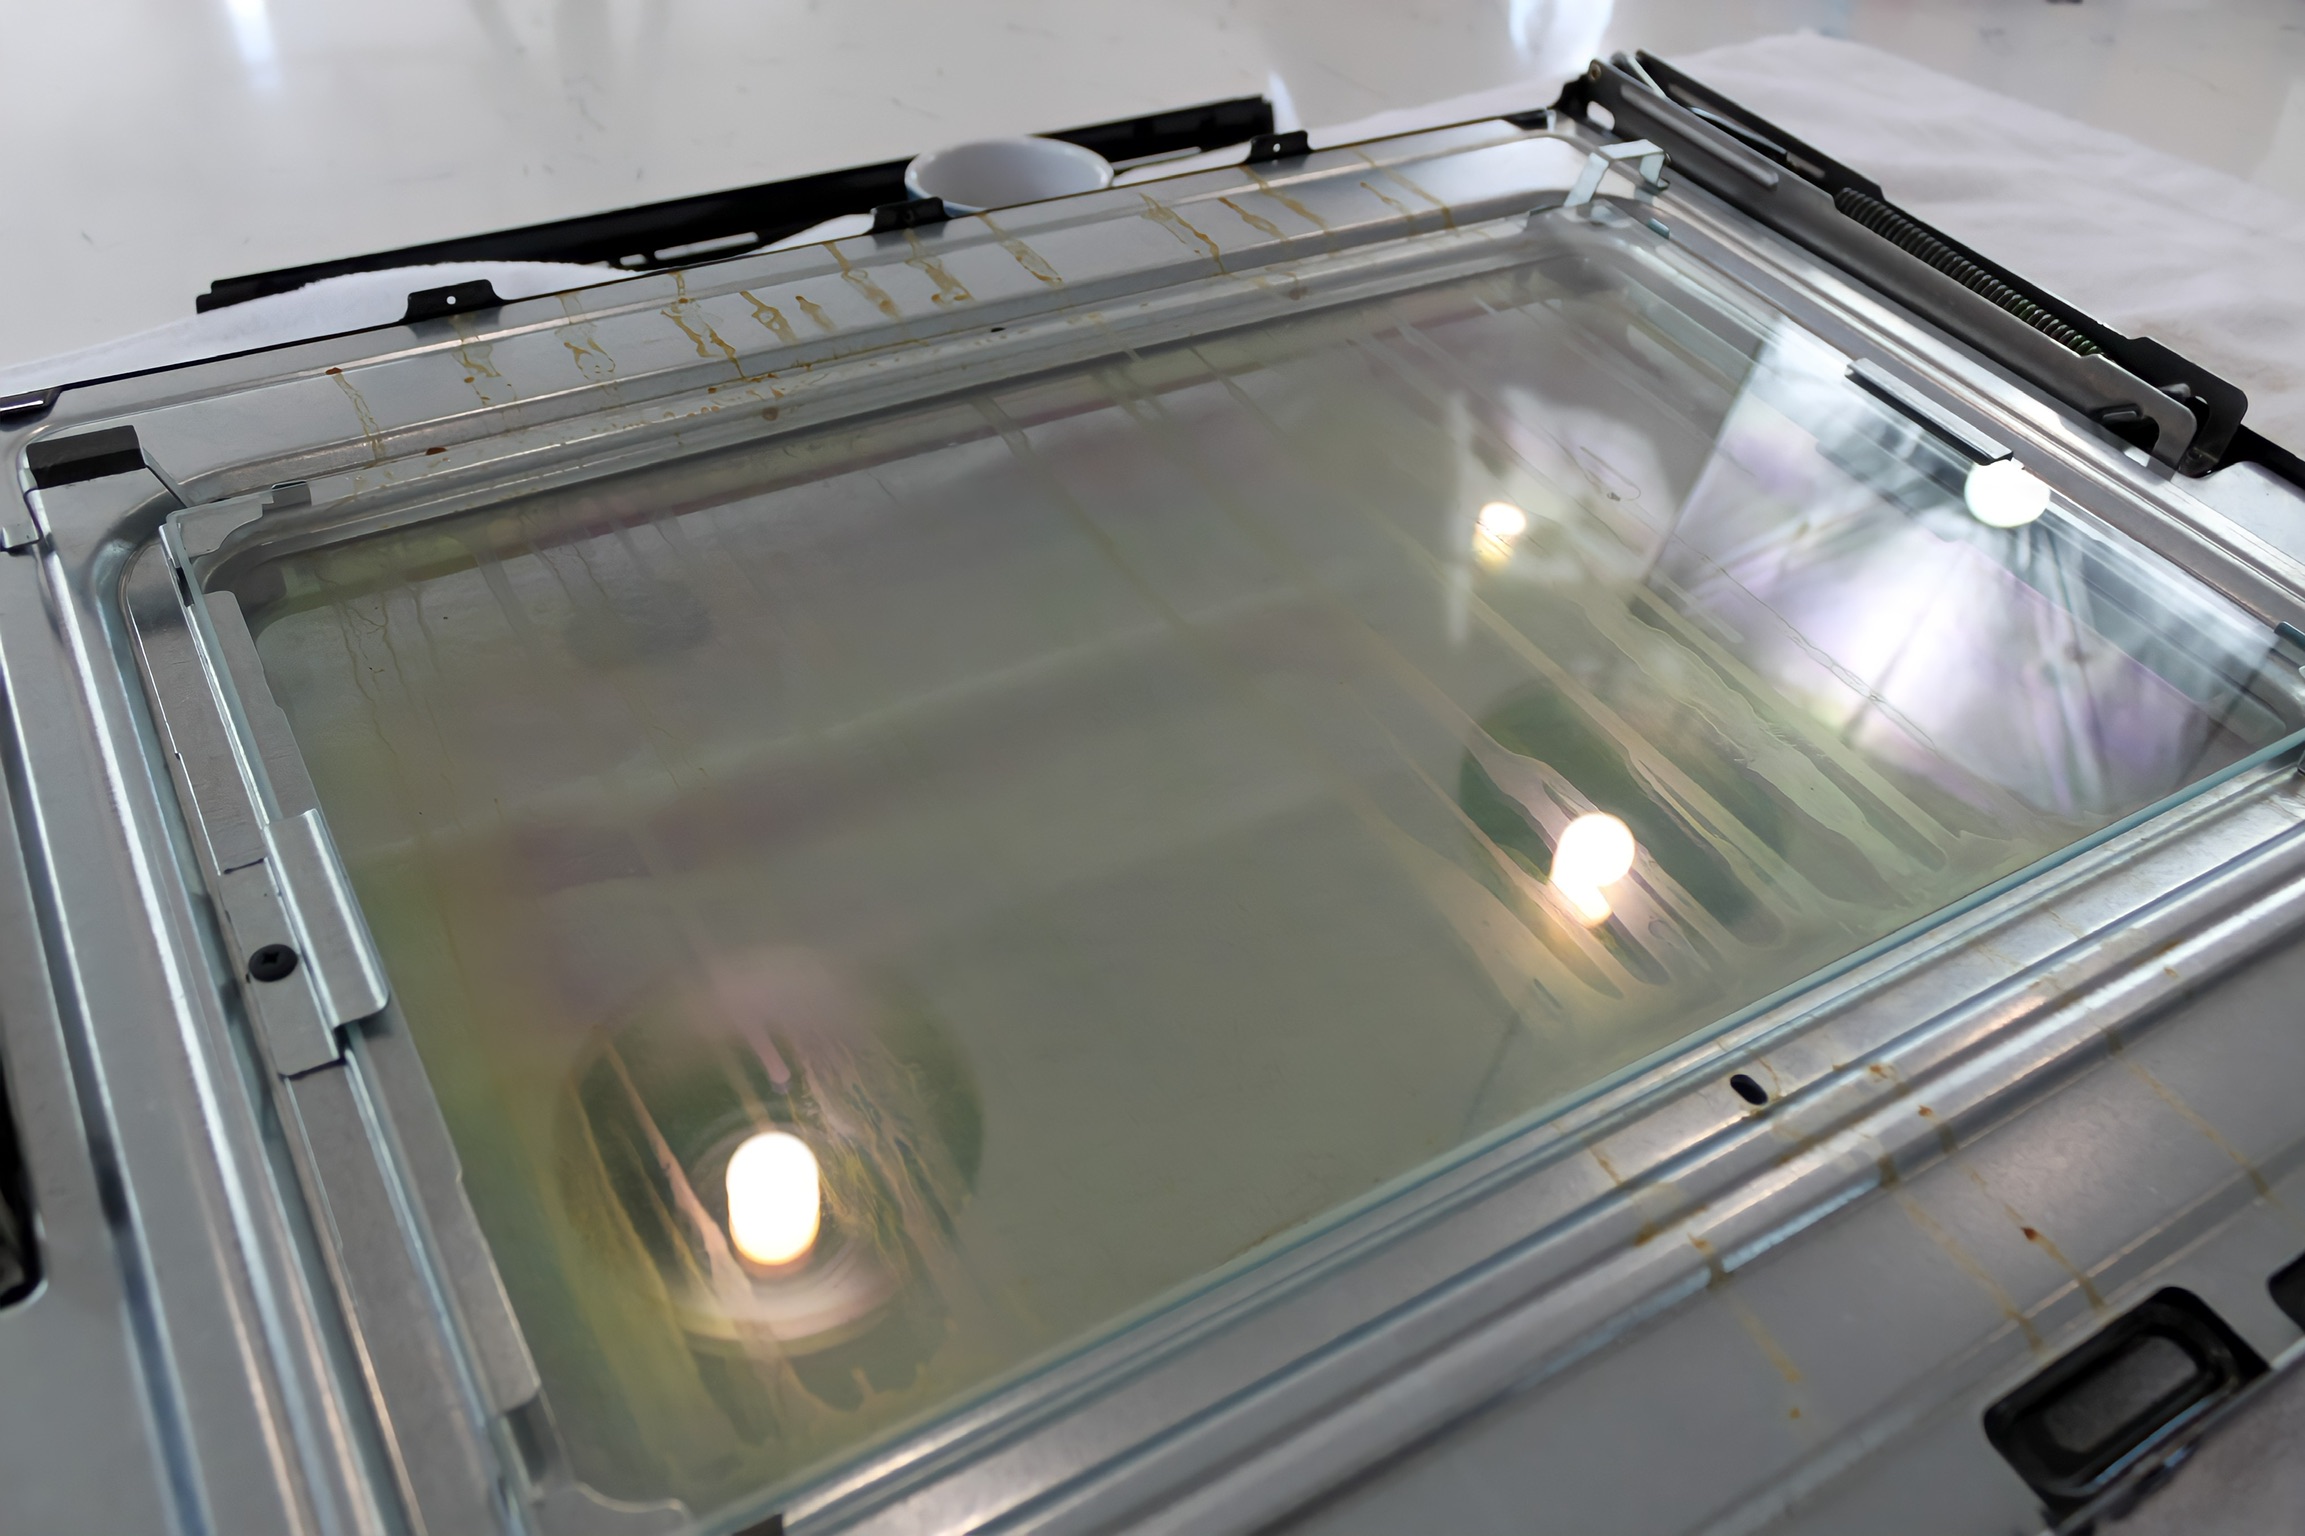
3. Once unlatched, open the oven door to about a 45-degree angle. It will stop itself and that’s when you’ll lift up to remove it. Make sure you are very careful and have some help, as the door can be quite heavy. Some oven doors have a third pane of glass between the interior and exterior glass. Be very cautious when moving the oven door. Keep it flat and parallel to the floor to ensure that the third pane does not slip out.
4. Gently place the door on your towel on the counter and grab your screwdriver. Place your loose screws into a small bowl so you don’t lose any.

PRO TIP: take a photo of your oven door before you take it apart so you can reference it later when putting it back together.
5. Carefully lift the door apart to reveal the interior of the door and a third pane of glass (if yours has one).
6. Grab your screwdriver again and remove the screws that are holding the third pane of glass in place. Gently move the glass so you can get to the other pane where most of the drip marks are.
7. Now, depending on how bad/baked on the drip marks are, you can either use oven cleaner or Dawn® Power Wash anywhere there are drips. (Use oven cleaner if the drips are quite baked on, or Dawn® Power Wash if they are not too terrible.)
Safety Pit Stop: Never mix chemical cleaning agents. Though we recommend you try different products based on the level of mess we must stress the importance of using them individually; never mix chemical agents or use them together, since doing so poses a serious health risk to you and your family. We also recommend wearing gloves at this step in the process. Open a window and get that air moving!

- Spray any dirty areas well and let them sit (start with 10 minutes and go from there).
- Wipe away with either an SOS® pad or just a cloth if it’s coming up easily. Remember that oven cleaner works in layers so if your door is particularly bad, you may need to repeat this step a few times to get it all.
8. Once you have it clean, windex all the pieces of glass for that extra shine.

9. Now, time to put it all back together. (This is a good time to reference the photos you took, or if you are having difficulty, Google your make and model.)
10. Line up all the holes for the screws, and screw them back in.
11. Bring your clean door back to the oven. Careful, it’s heavy. Line up the hinges with their slots, and place them back in. The door should stay in place once you get it in there, so don’t panic. Close your hinge locks, and shut the oven door. Voila!
Additional Tips for Success
Consider following these additional tips for even better results:
- Get to know your oven. It’s important to recognize that every oven is a little different. Many modern ovens are built similarly, but there are likely important nuances associated with your oven that you’ll need to know to remove and clean the glass door effectively. Make sure you read the owner’s manual carefully and get some experience with your specific oven so you can clean it competently and according to the manufacturer’s recommendations. After a few rounds of cleaning, you’ll feel much more confident about your cleaning routine here.
- Move the glass door carefully. The glass door in your oven was made to be heavy duty, capable of withstanding significant temperature and pressure. But that doesn’t mean it isn’t breakable. Please use caution when removing this glass door, moving it, and laying it down to clean. Always treat it as fragile.
- Hire a professional (if necessary). In some cases, you may struggle to remove all the grime and stains from your oven door. If you find yourself unable to make progress, consider hiring a professional cleaner to handle it for you.
Here’s our YouTube video tutorial in case you missed it!
You can sleep peacefully now that you no longer have to stare at the drip marks inside your oven door. If the rest of your oven needs a good clean, check out this article, and don’t forget to subscribe to our new YouTube channel to see more content from us!
For a list of our favorite products, click here.
Georgia @GoCleanCo


We're big on Instagram.
Follow @GoCleanCo for seriously satisfying videos and top-secret tips. Don’t be shy, come say hi.
gocleanco
581 2,583,931
Sarah McAllister
Collabs: [email protected]
Cleaning expert plus I do some other stuff which is always a wild ride
How to clean a silgranit sink.
Comment SINK and I’ll send you the cleaning method for all the other sinks 📖
How to clean a silgranit sink.
Comment SINK and I’ll send you the cleaning method for all the other sinks 📖 ...
Things that are worth the money: Cleaning Edition
Things that are worth the money: Cleaning Edition ...
Don’t tell @sarahsmomtrudy 👀
Don’t tell @sarahsmomtrudy 👀 ...
How to clean your bins and keep bugs and animals out of them.
One step I forgot to show here was I poured some Pine-Sol in the bottom of the bins to soften the gunk and filled with a bit of water and let them soak for an hour in the sun!
how to keep flies out of trash, how to clean trash and garbage bins
How to clean your bins and keep bugs and animals out of them.
One step I forgot to show here was I poured some Pine-Sol in the bottom of the bins to soften the gunk and filled with a bit of water and let them soak for an hour in the sun!
how to keep flies out of trash, how to clean trash and garbage bins ...
Monday morning ☕️ anyone?
Monday morning ☕️ anyone? ...
Come find my custom DIRTY SODA on the Secret Influencer Menu at the @covet.sips.sweets at the Calgary Stampede from July 3–12.
Dirty Bastard by @gocleanco
• Coke Zero, extra ice
• A splash of fresh raspberry purée
• A splash of peach purée
• Two fresh lime wedges
• Finished with a drizzle of coconut cream
It’s sweet, tart, creamy, fizzy — tastes just like summer.
If you’re headed to Stampede, order my Dirty Soda, you dirty bastards. 🤠🥤
#CalgaryStampede #DirtySoda #Stampede2026
Come find my custom DIRTY SODA on the Secret Influencer Menu at the @covet.sips.sweets at the Calgary Stampede from July 3–12.
Dirty Bastard by @gocleanco
• Coke Zero, extra ice
• A splash of fresh raspberry purée
• A splash of peach purée
• Two fresh lime wedges
• Finished with a drizzle of coconut cream
It’s sweet, tart, creamy, fizzy — tastes just like summer.
If you’re headed to Stampede, order my Dirty Soda, you dirty bastards. 🤠🥤
#CalgaryStampede #DirtySoda #Stampede2026 ...
Screen time said I averaged 25 hours a day….wut
Screen time said I averaged 25 hours a day….wut ...
Its tiiiiiiiiiiiiiiiiime!!!!!!!!!!!!!!
*something glitched in the workshop had to repost —Santa Sarah 🎅🏻
Its tiiiiiiiiiiiiiiiiime!!!!!!!!!!!!!!
*something glitched in the workshop had to repost —Santa Sarah 🎅🏻 ...