


4 Easy Steps to Deep Clean Your Oven
You know your oven needs cleaning. You can see it. There are chunks of burnt food and charred particles sitting on the bottom. Then there’s the grease caked on the lights and racks. It’s so filthy that you start having second thoughts about whether you should even be using it to cook food anymore.
While some manufacturers do make a self-clean feature on their appliances, these cleaning cycles aren’t as effective as you might like. They can perform some basic cleaning functions, but they aren’t removing scoops of burnt food matter.
You may think cleaning the oven is the worst job in the house, but it really doesn’t have to be. We assure you that you won’t blow yourself up if your oven is gas. And when you’re done, you’ll wonder why the hell you put it off for so long. Trust us!
The Dangers of a Dirty Oven
A dirty oven is more than an eyesore. It actually comes with a number of dangers and unwanted side effects, including:
- Safety issues. A dirty oven can be a fire hazard. When food and grease build up inside the oven, it could eventually give way to excess smoke or even flames. The smoke is not only a risk to the house, but it could prove dangerous when breathed in.
- Unwanted flavors. Some foods, like a steak or chicken breast, taste good with a smokey flavor. But leave smoking to the backyard barbeque. Nobody wants smokey bread or cupcakes – especially when the smoke is coming from year-old grease caked on the bottom of your oven.
- Unpleasant smells. Finally, let’s not forget about the unwanted smells that a filthy stove creates. All it takes is a little bit of buildup and your entire house will smell when you use the oven..
In other words, just clean the damn oven – it’s not worth it!
Thankfully, cleaning your oven doesn’t have to be a pain. Below, you’ll find a fool-proof how-to for oven cleaning where YOU get all the credit!
4 Steps to a Sparkling Clean Oven
Step 1 – Take Out Your Oven Racks
Whether it’s an entire laundry room, a playroom, or an oven, a good deep clean always starts with removing everything from the space so that you can get into every nook and cranny. This means step one is to take out your oven racks.
- Place the racks in the sink with two dishwasher tabs and very hot water. Let them soak for 2 hours. The dishwasher tabs lift the grease easily, usually without much scrubbing. You can also use a large Tupperware container or bathtub, but if using your bathtub, please protect it from scratches by placing towels down first.
- If there is a lot of grime, you may need to spray them down with an oven cleaner and place them in a garbage bag (instead of soaking them). The bag holds in the heat from the chemical reaction between the gunk and the cleaner, and it helps the product penetrate better. Please be VERY careful when spraying oven cleaner. It will eat the finish off countertops, backsplashes and hardwood floors.
Step 2 – Spray The Inside Of Your Oven
An essential part of this job is using the correct product for your type of oven. If your oven is self-cleaning, use only a fume-free oven cleaner. The heavy-duty oven cleaners can erode the interior lining of self-cleaning ovens, making this feature less effective and causing damage.
If your oven has a self-cleaning feature, you can find it on the control panel and the door will have a lock feature. Always follow the directions as stated on the product label. Open a window when using oven cleaner. You might even want to wear a mask to prevent breathing in the fumes. These are stable aerosol chemicals but do not use them near an open flame.
- Lay down some paper towels or newspapers on the floor surrounding the oven before you start. This will prevent the oven cleaner from ending up on your floor.
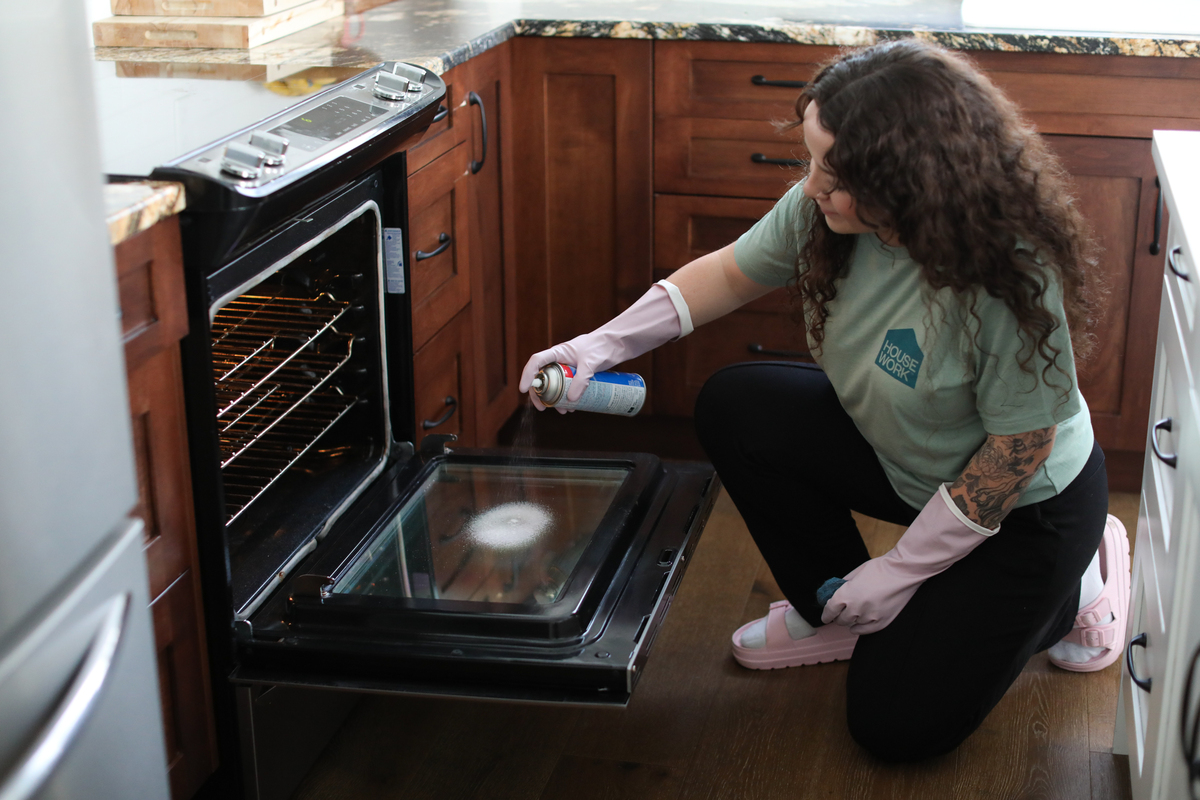
- Spray the inside of your oven, including the glass on the door. Don’t be shy and spray it down well! Ensure that it doesn’t drip down to the warming drawer or any cabinets below and immediately wipe down any overspray that may have occurred.
- Close the oven door and walk away. Oven cleaner needs time to work, so let it sit and penetrate for at least an hour.

Step 3 – Send In The SOS
Now for some light elbow grease and an SOS® pad. Wearing gloves is necessary as this is a messy job, and the chemicals will burn your skin.
- Scrub the entire oven, including the interior door glass, with an SOS® pad. If there is excess burnt-on grease, you may need to repeat these steps as the oven cleaner works in layers. (If you haven’t cleaned your oven in a while, this might be the case.)
- Use a wet sponge, cloth, or paper towel to wipe off the mess from scrubbing. Do this at least 3 times to get rid of all the chemicals. You don’t want that cooked into your food.
- When it’s clean, and you’ve removed all the oven cleaner residue, polish the interior glass using a polish cloth.

Step 4 – Polish the Exterior
The final step is to clean the exterior of your oven.
- Wipe the exterior of your oven using Dawn® dish soap and water to remove any food, drips, or smudges.
- Polish the exterior using Windex® and a polish cloth and call it a day. If your stainless steel is looking sad, use Weiman’s® stainless steel cleaner to shine it up.
If you’re feeling really brave you can check out our video below on cleaning inside the oven door glass!
Technically, you can use your oven immediately after cleaning it, but we recommend ordering dinner!
For a list of our favorite products, click here.
– Katie W @ GoCleanCo

We're big on Instagram.
Follow @GoCleanCo for seriously satisfying videos and top-secret tips. Don’t be shy, come say hi.
gocleanco
601 2,581,979
Sarah McAllister
Collabs: [email protected]
Cleaning expert plus I do some other stuff which is always a wild ride
Fall Fashion 🍂🧥is my fav
Comment FALL below and I’ll send you the deets
Fall Fashion 🍂🧥is my fav
Comment FALL below and I’ll send you the deets
I’ve tested a LOT of vacuums, and these are the ones I’d keep an eye on during Amazon Canada’s Prime Big Deal Days, Oct 6–7.
Comment LINK and I’ll DM you my picks. Because “whatever’s on sale” isn’t a vacuum-shopping strategy.
@amazonca #AmazonCanada
*Deals are subject to change, vary, or go out of stock.
I’ve tested a LOT of vacuums, and these are the ones I’d keep an eye on during Amazon Canada’s Prime Big Deal Days, Oct 6–7.
Comment LINK and I’ll DM you my picks. Because “whatever’s on sale” isn’t a vacuum-shopping strategy.
@amazonca #AmazonCanada
*Deals are subject to change, vary, or go out of stock.
Now available at Walmart 🛒 Molly’s Suds® #ad
This shirt was one stain away from becoming a cleaning rag. 😂 We put @mollys_suds Unscented Laundry Powder and Oxygen Whitener to work with a soak and a wash. Watch for the results. 👀
And remember: ALWAYS check your stains before putting anything in the dryer. If they’re still there, you’re not done yet.
Add these to your next Walmart run. ✔️
Now available at Walmart 🛒 Molly’s Suds® #ad
This shirt was one stain away from becoming a cleaning rag. 😂 We put @mollys_suds Unscented Laundry Powder and Oxygen Whitener to work with a soak and a wash. Watch for the results. 👀
And remember: ALWAYS check your stains before putting anything in the dryer. If they’re still there, you’re not done yet.
Add these to your next Walmart run. ✔️
Mini Vlog Giveaway! 👇🏼
What’s the weirdest thing you have found in your washing machine…I’ll go first: Watch until the end….I think this thing was growing some magic 🫘
Comment below to enter to win a Shark Blast Boss + a year’s supply of laundry goodies.
* Not sponsored or affiliated with Meta. See rules on our website www.housework.com/contest-rules/ Contest ends Oct 1 at midnight.
Mini Vlog Giveaway! 👇🏼
What’s the weirdest thing you have found in your washing machine…I’ll go first: Watch until the end….I think this thing was growing some magic 🫘
Comment below to enter to win a Shark Blast Boss + a year’s supply of laundry goodies.
* Not sponsored or affiliated with Meta. See rules on our website www.housework.com/contest-rules/ Contest ends Oct 1 at midnight.
Once the snow hits, these jobs get a whole lot harder. 👀
Once the snow hits, these jobs get a whole lot harder. 👀
I’m doing a weekend @amazonlive at 6 pm MTN/8 pm EASTERN tonight. I’ll show you my fav bathroom cleaning products and cleaning routine. COMMENT LINK and I’ll send you the link to watch! Ask me questions in the comments! #ad
I’m doing a weekend @amazonlive at 6 pm MTN/8 pm EASTERN tonight. I’ll show you my fav bathroom cleaning products and cleaning routine. COMMENT LINK and I’ll send you the link to watch! Ask me questions in the comments! #ad
The FREE Fall Cleaning Challenge Download is here. The provides you with a checklist to follow for every room in your home. You can print it! We even put QR codes for videos for you to watch if you don’t know how to clean something. These challenge resets your home so the in between maintenance cleaning isn’t so difficult to upkeep. Plus you get entered to win PRIZES FOR CLEANING YOUR HOUSE 🧹 🧽 Comment LINK below and I’ll send you a link to the freebie download.
The FREE Fall Cleaning Challenge Download is here. The provides you with a checklist to follow for every room in your home. You can print it! We even put QR codes for videos for you to watch if you don’t know how to clean something. These challenge resets your home so the in between maintenance cleaning isn’t so difficult to upkeep. Plus you get entered to win PRIZES FOR CLEANING YOUR HOUSE 🧹 🧽 Comment LINK below and I’ll send you a link to the freebie download.
THE FALL CLEANING CHALLENGE STARTS NOW. 🍂🧹
Download the FREE Fall Cleaning Challenge from Housework.com and you’re automatically entered to win $5,000 + our favourite cleaning gadgets. 💰
Then follow along as we deep clean the whole house together over the next 4 weeks.
Comment LINK and I’ll send you the free download. 👇
Week 1: Outdoors + Laundry Room. LET’S GO. 💪
THE FALL CLEANING CHALLENGE STARTS NOW. 🍂🧹
Download the FREE Fall Cleaning Challenge from Housework.com and you’re automatically entered to win $5,000 + our favourite cleaning gadgets. 💰
Then follow along as we deep clean the whole house together over the next 4 weeks.
Comment LINK and I’ll send you the free download. 👇
Week 1: Outdoors + Laundry Room. LET’S GO. 💪